Showing posts with label Guest Post. Show all posts

Looking for Guest Posts!

Posted by Unknown on Tuesday, May 22, 2012

Dear Readers,

It's not been long since I started writing this blog. And I already have over 300 followers! I want to thank all the people who takes time to read my posts and leave comments... I really enjoy reading them...

So, the thing is, I try to post every 2 or 3 days but I'll be on holiday for a month and I don't want my page to stay still... :) So I am asking my fellow bloggers to guest post for me...

If you are interested, please leave a comment under this post. I am planning to stock up and maybe I'll be able to post from my holiday but I still need a minimum of 10 guest bloggers... :)

You are welcome to share your nail designs, stamping, swatches or reviews...

Thank you all in advance... :)
More aboutLooking for Guest Posts!

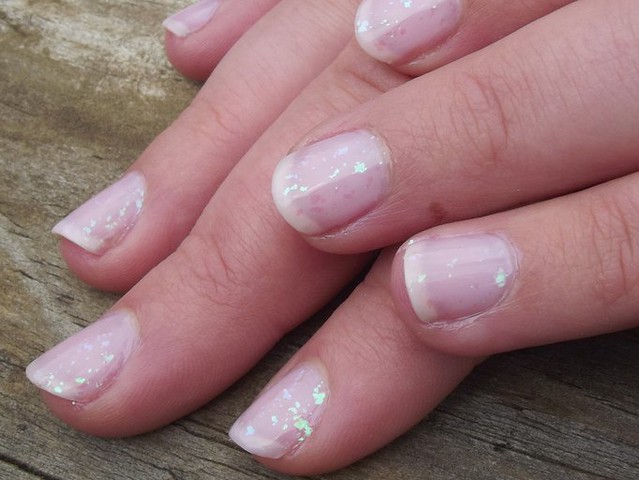
Guest Nails: French Flake Manicure

Posted by Unknown on Sunday, January 15, 2012


My sister let me take a photo of her french manicure!

She used a base of Color Club Milky White Base Coat, followed by a coat of Essie Mademoiselle, topped with NFUOh 050.


Very simple and easy to do :)
More aboutGuest Nails: French Flake Manicure

GUEST POST: Featuring Linda from Copy That, Copy Cat

Posted by Unknown on Wednesday, October 19, 2011

October 19, 2011

Linda from the blog Copy That, Copy Cat is visiting today!  She is so creative with her very awesome manicures, so make sure to click on her blog url and follower her. You will not be disappointed; I can promise you that.

Please welcome Linda from Copy That, Copy Cat!
__________________________________________________________

This is my first guest post and I'm really excited about it! I'd like to thank Amy for giving me the opportunity to be featured on her amazing blog :)

I wasn't sure exactly what I wanted to do for this post, and just decided on something spontaneously. Today, i'll be doing a simple rose nail art tutorial which kind of remind me of graffiti art. Hope you all enjoy this design!

I've painted my base colour in China Glaze Skyscraper - I absolutely love this colour and I really like it with a matte finish (because it looks like a suede finish and I really want to get my hands on one of them!). My inspiration to do this colour was when I painted my toes in Skyscraper and added a matte topcoat LOL. Anyways, on to the nail art!

Sorry if some of the pictures are blurry, I was taking them at a peculiar angle. Sadly there was no one home to help me take pictures!

First, start with 2 coats of ChG Skyscraper.


Using black acrylic paint, or black polish, paint a circle-like shape on the corner of the free edge and then draw smaller ones beside them. Draw a leaf shape at both ends of the smaller circle
.

Time to start painting the roses! Start off by drawing small c shapes with white acrylic paint or polish at the centre and then work your way out. Keep drawing until you almost reach the edge of the black underneath. Don't mind the streakiness, they're not as noticeable in real life! Macros literally magnify EVERY SINGLE DETAIL!
Repeat the previous step for your smaller circles and draw in the leaf at the ends.

Apply a matte topcoat (I'm using Essie Matte About You) and you're done! Of course, you can use any topcoat you'd like :)

Finished product - love the matte!


I hope this was easy to follow! Thanks again to Amy for featuring me on her blog. If you'd like to see more nail art, feel free to visit my blog at www.copythatcopycat.blogspot.com or my Facebook page at http://www.facebook.com/pages/Copy-That-Copy-Cat-Nails/227255990644141

Thanks for reading, hope you enjoyed this post!


More aboutGUEST POST: Featuring Linda from Copy That, Copy Cat

GUEST POST: Featuring Tressa from O'Natur Nail

Posted by Unknown on Wednesday, October 12, 2011

October 11, 2011

Please welcome Tressa from O'Natur Nail!!!! I am delighted to have her on my blog today! Make sure to stop by her blog/Facebook page and follow!
__________________________________________________

Many thanks for Amy including me on her blog.  I choose to do this guest post during a month that is dedicated to a cause that's near & dear to so many of our hearts, Breast Cancer.


The nail design here was inspired by the website, http://www.thefightlikeagirlclub.com.  I really loved the color scheme being that it wasn't your typical bright white and pink.  What's cool about the site is that it has lots of important information, encouragement and support for many types of cancer.  Simply put, "Cancer Sucks".  If anyone is interested in supporting the cause(s), you can go to the fundraising section of their page or donate to Susan G Komen, http://ww5.komen.org/.  (Or eat yogurt and save the lids!!!)

Onto the nails.....

On the thumb: Zoya 'Dove' & black art pen by Kiss with the site's Logo written on it ~Nubar '2010' on top
Pointer finger:  Finger Paints 'Stunning Stilettos' splattered with Finer Paints 'My Art Belongs to You', Revlon 'Watermelon Fizz', and Kiss 'Bikini Pink'
Index finger:  Zoya 'Dove' with Kiss 'Silver glitter' and Kiss 'Black' spots (like the websites background)
Ring finger:  Orly 'Rock Solid' and Kiss 'Bikini Pink' (a boxing ribbon)
Pinky finger:  Finger Paints 'MABTU' with Opi 'Black Shatter' with a layer of Zoya 'Sparkle Gloss' over top


You can look at these as almost symbolic:  Black Shatter for life changing news.  The Logo for the fight ahead.  The splatter for all the tests to endure.  The tire treads and spots for the ups/downs.  And the ribbon signifying strength, unity, community and love.

I hope you all enjoyed my rendition/creation for BCAM and if so, please like my facebook page and/or subscribe to my blog:
It's fairly new so there is still lots more to be added!!  

Thanks for reading & reflecting! XoX - T
More aboutGUEST POST: Featuring Tressa from O'Natur Nail

Guest Post: Featuring Lauren from A Polish Change!

Posted by Unknown on Wednesday, October 5, 2011

October 05, 2011

Guest Post
Please welcome Lauren from A Polish Change! 
I am featured on her blog today too, so make sure to stop by her blog (and follow because her blog is awesome)!
______________________________________________


When Amy and I arranged to swap blog posts, I was immediately excited but then was hit with a tsunami wave of nausea (C'mon, it's not every day that you get to intrude on the web page of your "Nail God").   I'm feeling Nail-Venturous was the first blog that I ever stalked, and Amy's creative and beautiful nails inspired me to start my own blog last month.  Needless to say, this called for something special- my first glitter sandwich!

I'm sure all of you know what it is, but just in case you don't:  the sandwich manicure is where a base color is laid down first, followed by an clear base glitter polish, and then topped with either the base color again or a sheer polish that lets the glitter shine on through.

Decisions, decisions….Over a good coat of base coat to protect my nails, I painted a thin coat of Essie's Little Brown Dress.  For my glitter layer, I chose Crown Me Already from OPI's recent Ms Universe Collection.  And if that wasn't enough, I topped it all off with Essie's Bordeaux (a burgundy jelly).  


And there you go, my kind of sandwich, calorie and fat-free!  Many thanks again to Amy for swapping posts with me.  If you'd like to check out my blog, A Polish Change, please do so at polishchanges.blogspot.com ... it's not nearly as "polished" as this site, but I'm trying!!
-Lauren

___________________________________________________________________________

Make sure to stop by Lauren's blog! She is always posting awesome manicures and new ideas such as the one in this post. I never thought about using two different polishes as the "bread" of my jelly sandwich. Have you?
More aboutGuest Post: Featuring Lauren from A Polish Change!

GUEST POST: Featuring Kelly from KellsDIYnails on Facebook!

Posted by Unknown on Wednesday, September 28, 2011

September 28, 2011

Guest Post by Kelly!

Welcome Kelly to my blog! She has a Facebook page dedicated to her nail art, so make sure to stop by there and check it out! And she is welcome back to my blog anytime! 
_______________________________________________________________________________


A big ‘Hello!’ to Amy’s Followers!

I am so very appreciative to be able to do a guest post for Amy today. This is my very first time doing a blog post so I reviewed this about a million (+1) times before clicking on the ‘Send’ button.

My name is Kelly, I live in Southern California , and I do not have a blog (Wow, kinda feels like an AA meeting) ;-). However, I do have a Facebook page (facebook.com/KellsDIYnails). Initially, I was posting pictures of my manis on my personal page, but then I got some negative feedback from friends who are not ‘Nail Nuts’. So, to prevent further negativity, I created my Nail page. I’ve only had my page up for a couple of months now, but I am having a blast meeting other ‘Nail Nuts’ and talking all things nails and polish.

I would love to share more, but I want to get to the heart of things… My mani!

One of these is not like the other…


Zoya: Kimmy, Tanzy, and Penny

I ended up choosing all Zoya for this mani. Two of these Zoya’s are from the Sunshine Collection (Kimmy & Tanzy). The odd man out, is Penny. Yes, I know it is officially Autumn, and with all the widespread panic over all the fantastic Fall Collections, why am I still using Summer Collection polishes??? Well, because I was saving Kimmy for a night out and it just so happens I am going out tonight. Kimmy makes for the perfect accessory, She is vibrant, sparkling, and sexy. I used Kimmy as my main color; Tanzy and Penny are her back-up dancers.


Zoya, Kimmy. 2 coats. Out of all of the Sunshine Collection polishes, Kimmy and Reva are the more opaque colors. You can see some VNL in the photo, but it is not as noticeable in real life. The formula is a golden glass-fleck that is thin and jelly-like. Very easy to manipulate on the nail. Zoya also has a great brush. It fans out well on the nail and holds a nice amount of polish. Zoya is definitely one of my favorite polishes. It’s a little on the expensive side ($8), but the quality is superior to other brands in the same price point.


Accent Nail: Using the sponging technique, I sponged Tanzy over Kimmy on about 2/3 of my nail, and then sponged the tip with Penny. Zoya’s Sunshine Collection is great on its own, but the layering options you get with these are a blast to play with; Instead of using a gold glitter in a clear base as a layering option, try Tanzy, Rica, Apple, or Faye. It’s super pretty! If you try it, drop me a line on my Facebook Page at facebook.com/KellsDIYnails and let me know what you think! While you’re there, ‘Like’ my page.


Barielle, Get Mauve-ing with Zoya, Faye on top; Essie, Who’s She Red with Zoya, Rica on top.

It’s been a blast blogging with you today!!!


More aboutGUEST POST: Featuring Kelly from KellsDIYnails on Facebook!

GUEST POST: Featuring the one and only Carly from Lacquered Lover

Posted by Unknown on Wednesday, September 21, 2011

September 21, 2011

Welcome my first guest blogger: Carly from Lacqured Lover!!


I am featured on her blog today too, so if you miss me, check me out on her blog!
_____________________________________________________

Hello fellow laquered lovers!  First of all, a big thank you to Amy for doing this guest swap post with me!  I’m so excited!  I love her blog and it was really fun to plan this!  We decided to both do Fall themed manicures since it is finally Autumn so be sure you head over to my blog at www.lacqueredlover.com to check out her post as well!  I hope you enjoy!


I started with my trusty OPI Nail Envy (has worked wonders for my nail strength) and a coat of Wet N Wild Black Crème.  Black Crème is probably my favorite black because it’s a one coater!)  Then I added a coat of Nfu-Oh 60.  Nfu-Oh 60 is a black jelly packed with red, green and gold flakies.  I love flakies!  It is such a fun finish and I love that in different lights it flashes different colors!  Also, the Nfu-Oh bottles are gorgeous!  60 was my first flakie I ever bought and there have been many more since then, but I think it is still my favorite!


Then I decided to do a tape manicure with my new orange pumpkin glitter I picked up at Rite Aid yesterday!  They had such a fun display and the bottles were so cute that I couldn’t resist!  The glitter is suspended in a clear base and is very thick, so if you pick any of these cute bottles up beware!  After sticking the tape against my hands a few times, I placed it diagonally (as you can see I went in opposite directions on every other nail.)  Remember to not let the polish dry or else it will pull up the polish with the tape!  Please excuse some of the pieces of orange glitter on my hands, some of them were jumpers and I couldn’t get them all off my skin!

So there you go, a super fun Autumn inspired manicure!  I think this may be what I do for Halloween!  Again, a big thank you to Amy for doing this swap post with me!  Don’t forget to check out www.lacqueredlover.com for some fun manicures, reviews and giveaways!


More aboutGUEST POST: Featuring the one and only Carly from Lacquered Lover