Showing posts with label cartoon. Show all posts

31 Day Challenge - Day 26 - Pattern

Posted by Unknown on Monday, June 18, 2012

This one is a bit of stretch.... But I knew at some point I would HAVE to do CatDog. So my coorelation is that there is pattern to the entire cartoon. Everything is half and half, like their house is half fish and half bone, the wallpaper will be part cat and part dog themed. And basically all of the plots revolve around the same pattern. Dog is silly and dumb, while cat is the mastermind. So just go with me here....

My cousin was in town visiting and she's been my gracious hand model for previous cartoon manicures. She volunteered again. Am I just delusional? Or do our hands/nails look similar? Even our nail beds are the same shape. I guess it just proves that we are in fact related!

Here I did the sign that is behind them in the intro shots. All done with acrylic paints. 
The base polish is Essie Navigate Her.

Then on the other hand I painted their body stretching across her nails. It made for a really cool french tip on the middle nail. :)

More about → 31 Day Challenge - Day 26 - Pattern

31 Day Challenge - Day 30 - Inspired by a Tutorial

Posted by Unknown on Wednesday, June 13, 2012

Who better for a tutorial than Dora the Explorer? She is so educational and helpful. She teaches children Spanish all day every day. So today she's teach you how to say "nail polish" in Spanish.
Apparently it is "Esmalte De Unas"

Thumb - China Glaze Dance Baby
Index - Essence The One & Only
Middle - Sally Hansen Xtreme Wear Blue Me Away
Ring - Revlon Sorbet
Pinky - Sally Hansen Xtreme Wear Green with Envy

I love how the thumb turned out. It may be on of my best lettering jobs in nail art. Usually that is what I struggle with the most. 

Dora herself was done with acrylic paint, but the lettering was all done using the nail polish shades listed above.

More about → 31 Day Challenge - Day 30 - Inspired by a Tutorial

31 Day Challenge - Day 29 - Supernatural

Posted by Unknown on Monday, June 11, 2012

Again, I'm going out of order, but just deal with it. I'll cover them all in the end.

A unicorn is supernatural correct? I'm taking it from the definition of  "being seemingly against the laws of nature." This is Buttercup the Unicorn from Toy Story 3.

This is the sweetest supernatural thing I've seen in...... maybe forever. 


I first painted my nails with China Glaze Lemon Fizz, then China Glaze Crackle Lightening Bolt. Then I did a coat of Sally Hansen Glass Slipper for an extra magical quality. I freehanded Buttercup with acrylic paints.

More about → 31 Day Challenge - Day 29 - Supernatural

31 Day Challenge - Day 27 - Inspired by Artwork

Posted by Unknown on Friday, June 8, 2012

I realize I'm going out of order, but I haven't had time to execute my idea for "inspired by a pattern" just yet, so rather than sit on these pictures.... I wanted to show them to you and I'll come back to Day 21 when I get done. ;) My blog, my rules. Lol

Artwork.... Cartoons..... Sonoma Nail Art hit the nail on the head when she suggested the Gargoyles from The Hunchback of Notre Dame! Wonderful idea! Thanks again Michelle!

The base polish is Zoya Kristen stamped with Barielle Coco Bar and the bundle monster pebble image. All of the Gargoyle art was done with acrylic paints.
Left is Hugo
Middle is Victor
Right is Lavergne


 So I haven't forgotten about the challenge, I've just been scatter brained.


More about → 31 Day Challenge - Day 27 - Inspired by Artwork

31 Day Challenge - Day 25 - Inspired by Fashion

Posted by Unknown on Monday, May 14, 2012

What better cartoon fashion than Cinderella's Glass Slipper? I had no choice but to use Sinful Colors Cinderella and Sally Hansen Diamond Strength Glass Slipper! 

I used Color Club Starry Temptress Topcoat and China Glaze Fairy Dust for my little glitter swirls on the other nails. 


Here is a gif tutorial of how I painted the thumb nail.
http://picasion.com


More about → 31 Day Challenge - Day 25 - Inspired by Fashion

31 Day Challenge - Day 24 - Inspired by a Book

Posted by Unknown on Friday, May 11, 2012

My mother actually works at the local library in specialized program within the children's department. She told me about this book a while ago, and it's stuck in my memory. My memory was jogged, when a follower suggested any of Mo Willem's books because she's a school teacher and all of her students love his work. She mentioned the characters Gerald and Piggy, but I knew I'd have to focus on the Pigeon!

The book cover is shown below. "Don't Let The Pigeon Drive The Bus!" basically, the entire book is the Pigeon just begging to drive the bus. Little kids love it because they catch on quickly and like to participate by telling the Pigeon, "No!"
Description from the website:
"When a bus driver takes a break from his route, a very unlikely volunteer springs up to take his place —- a pigeon! But you’ve never met one like this before. As he pleads, wheedles, and begs his way through the book, children will love being able to answer back and decide his fate. In his hilarious picture book debut, popular cartoonist Mo Willems perfectly captures a preschooler’s temper tantrum."   

I just love the muted color palette too, it's really nice! 

Lettering is always a problem with me. I barely managed to squeeze on that "S."

And Pigeon! The background color is China Glaze Sunset Sail. I also used acrylic paint in black, white, and yellow. Pigeon's body is China Glaze Sea Spray.
So remember, don't let the pigeon drive the bus! No matter what he says!
More about → 31 Day Challenge - Day 24 - Inspired by a Book

31 Day Challenge - Day 23 - Inspired by a Movie

Posted by Unknown on Monday, May 7, 2012

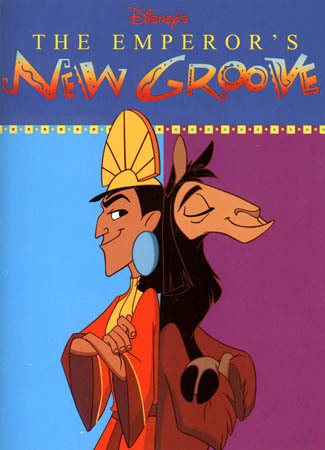
The Emperor's New Groove! 
These were suggested by a follower but you didn't leave your name?! So thanks to whoever you are. You reminded me of this hilarious cartoon that I had forgotten about! Emperor Kuzco is turned into a llama and has to learn some important lessons. David Spade and John Goodman are some of the contributing voices. 

I mainly used this image as inspiration.

I started to paint the lettering orange, but it didn't show up well enough. I just painted yellow on top.


What do you think? Did you see this movie growing up?
More about → 31 Day Challenge - Day 23 - Inspired by a Movie

Peculiar Polish Series - Maleficent

Posted by Unknown on Thursday, May 3, 2012


It's another Thursday and time for more Peculiar Polish! Nev from Nevorpurify's Nail Art  is helping me out by designing looks that are more obscure cartoon characters. If you have a suggestion for her, just fill out the embedded form at the bottom of the page!
Here's Nev->
Maleficent is the villainess in Disney's adaptation of Sleeping Beauty.  She sometimes takes the form of a dragon - one of the coolest dragon designs in animation!  I'm happy that Eva suggested this tutorial, because two of my favorite nail artists have previously done Maleficent nail designs, so I feel honored to offer my take on the character (check out Robin Moses's here and Sonoma Nail Art's here). 
Sorry about the orientation, I tried to no avail to fix it without success. Start out with grey nails. 

Add on darker grey blobs. To preserve the shape of Maleficent's face begin by only outlining her face. Outline the dragon in black as well.

For the non-accent fingers add in stripes of different shades of grey and purple. For Maleficent's face use a very light grey. After you fill in her face, add in here horns and neck line. Use yellow to fill in the dragon's mouth and put black teeth on top of it. The dragon's belly is purple.


Detail Maleficent's face by adding eyebrows and a nose. Just below her eyebrows add in light purple eyeshadow. 

Give the dragon a nose, eyes, and stripes on her belly. Conclude with Maleficent's eyes, lips, and use light grey to stripe her horns. 
More about → Peculiar Polish Series - Maleficent

Peculiar Polish Series - Moomin

Posted by Unknown on Thursday, April 19, 2012

It's another Thursday and time for more Peculiar Polish! Nev from Nevorpurify's Nail Art  is helping me out by designing looks that are from different cartoons that may be a bit less well known. If you have a suggestion for her, just fill out the embedded form at the bottom of the page!
Here's Nev->
Thumb: Moomins logo
Index: Little My
Middle: Moomin
Ring: Sniff
Pinky: Snork-Maiden
When an anonymous person requested these Moomins nails, I have to admit I wasn't very excited. I hadn't heard of the Moomins and, although they seemed cute, I didn't really get it. Well, since then the Moomins have invaded my life! Let me first tell you about the Moomins: they started out as a Swedish book and comic strip that centered around the Moomins (who are a family of trolls). Eventually the empire expanded and since their creation there have been movies, television shows, and even a theme park (!) devoted to the Moomins. Now I'll explain why the Moomins have become so exciting to me: Ron (my fiancee) doesn't usually get so excited about my nail art. Usually (unless I'm doing something Star Wars or Hellboy related) he could probably care less. But when I started researching the Moomins to figure out how I would do my nails, Ron suddenly became obsessed. I was watching a clip of the Moomins on YouTube which had the Moomins theme song. Well, ever since then Ron has been walking around singing a modified version of the theme song. Since he doesn't actually know the lyrics he just goes, "Moomins, Moomins, Moo Moo Moo, Moomins." (If you want to hear him sing it, check out the audio clip at the end of the post). It has been about two weeks and he hasn't stopped. It's endearing and annoying at the same time. Anyways, now that Ron is thoroughly obsessed he brought me home a Moomins related present -- Moomins biscuits! I haven't eaten them yet but they sure look delicious! Here is the requested tutorial: 

Start with a sky blue (I used a light blue Color Club) on your fingers and white (I used  Wet n' Wild's white) on your thumb.
Use black acrylic paint to silhouette the characters. On the thumb make a half circle for the sun and use small strokes to create black sun beams. 
Make each character the correct color while leaving a small black outline. Now is also a good time to add their necks (I don't do it earlier so that I make sure my outlines stay crisp). Also add in the black on Sniff's ears and touch up Snork-Maiden's hair. 
Begin filling in the details. Little My gets orange hair and a lot of facial details while the  others mostly just get eyes and eyebrows. 
Dot in the characters eyes and finish the thumb by adding the Moomins logo at the bottom.  After you finish your nails with some top coat, you're done!
Mmm... Moomins biscuits!


...and here is a clip of Ron singing his version of the Moomins Theme:

More about → Peculiar Polish Series - Moomin

31 Day Challenge - Day 20 - Water Marble

Posted by Unknown on Monday, April 16, 2012

The Tazmanian Devil! I wanted the marble to represent the chaos tornado that was his method of travel.
This didn't turn out exactly like what I had in mind, but it's the best I could do considering that I'm not well acquainted with water marbling. It's just not my preferred method of nail art. I don't have a lot of practice, and it took me over an hour to just get 3 nails done! My design in the water kept looking like crap.
In the end I seem to have combined every nail art technique known to man in one manicure. 
Water marbling, polka dots, freehand, and rimming the edges.

Here's a GIF of how I painted Taz.
make an animated gif
This was my first attempt at this manicure. 
I wanted spiral designs, but it mostly ended up looking like Agate stones. I had finished this late into the night and didn't have time to paint Taz then. And I didn't like the gray patches. So I just removed it and attempted again another night.

This was the next opportunity I had to watermarble. I settled on just trying to get vertical stripes across the nails. The middle nail and thumb were the closest to what I had in mind.

I had seen someone that posted simple polka dots on top of their water marble to hide the bubbles or flaws. So I went with that. Lol. Again, it ended late into the night and had to go to work the next day, so I left it at this stage.

The next night, I freehanded Taz on the index because that was my least favorite marble design.

I had some minor tip wear, but a good deal of shrinkage around the cuticle from a coat of Seche Vite over a long since dry manicure. So to hide that I did some "rimming" or freehanding a border/frame around each nail. I just used a Kiss Nail Art Striper in black. Then another coat of Seche Vite.
I was undecided at first, but I think I like how it turned out!
More about → 31 Day Challenge - Day 20 - Water Marble