Home » Posts filed under Mummy
Posted by
Unknown on Monday, September 19, 2011
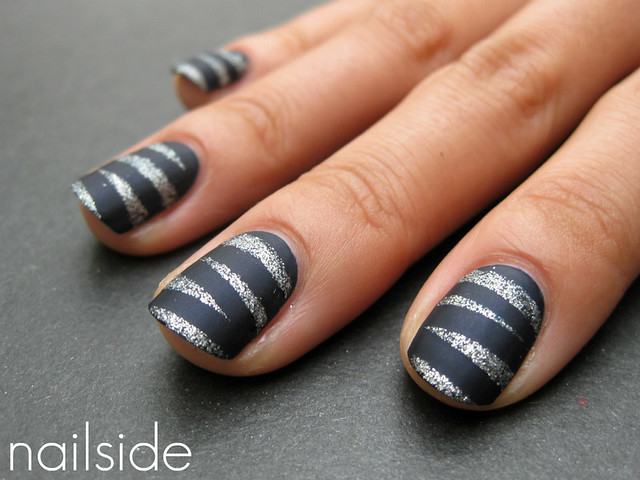
Oooh, it's time for the mummy design again :) Haven't done that one in a while! This time I was going for something chic and festive. As my base color I'm wearing
OPI Russian Navy and on top of it I used China Glaze Silver Lining for the mummy design. Normally I wouldn't suggest using a glitter as a layering polish for tape manis, because most of the time they don't cover very well, but it all just depends on the density of the glitters. And Silver Lining has very dense glitter so not a problem for tape designs. It did leave me a gritty and uneven surface so to smooth it all I applied Essence Matt topcoat. Can't resist mattified glitter! Thanks for watching :)
Posted by
Unknown on Thursday, July 7, 2011
Hi guys! Yesterday I've posted my
second Essence-only skittle. But as you may know by now, I'm not able to leave a skittle blank for too long, sooner of later the skittle gets bored and starts begging me for a little party. So that's what I gave it and it was mummy-themed.


And if you've read my blog regularly, you'll also know how I love mattifying my manis. And... that's how I messed up my skittle. See those little white spots? That's my Essence matt topcoat getting old. The poor fellow's been working too much and now he can't do his job properly anymore. The first time I had this problem, I just thought I hadn't been careful enough and that those spots were just dust floating in the air or something. But the spots weren't ON the surface so I could lift them up with my tweezers, they were IN the surface and had no intention of getting out. Then I noticed how I always ended up with those spots after I mattified it. So I bought a new bottle of matt topcoat and problem solved. The spots were caused by applying the matt topcoat with too thick coats which eventually happens as the polish gets goopier as it gets older. New bottles have a thinner formula and don't have that problem. So I added some thinner to my old bottle and now it's as good as new again. I absolutely loved my Essence matt topcoat, it works and it's cheap, so I was pretty bummed when I discovered those white spots - its only downside. But fortunately we've cleared that problem and now we're BFFs again. The end :)
Posted by
Unknown on Saturday, June 25, 2011
Hello dear readers :) For this post I've got something from the vault again. The weather pretty sucked this week, so I haven't been able to do a lot of photographing. I hope it's going to get better from now on, because I'm dying to take some decent pics again! Let's go to the mani then. I was wearing Ahoy! from China Glaze as my base color. But since I found it a bit sheer I applied it over two coats of NYC Rosy
Knows. The day after I did the
mummy tape pattern on top using Color Club Where's The Soiree?. I intentionally let the black top color cover all the tips, so you can't see my tipwear anymore, shhh! ;) Thanks for reading!
Posted by
Unknown on Thursday, June 23, 2011
Hi dear readers! Today I've got something from the vault to show you. It's a mummy mani I did the other day, using extra small tape strips. I was wearing Orly Ancient Jade as my base color and on top I used
Essence Chuck. As I told you yesterday in the
comparison post, Chuck is very well pigmented and has a great formula, which make it a perfect polish to use for tape manis.
I also wanted to tell you all that I'm working on a bigger post with tips and tricks to improve your taping skills, because I know some of you still have trouble with that. So if you have any questions regarding tape manis you'd like me to answer, just post them in the comment section of this post and I'll include the answers in the upcoming 'Tips and tricks' post. Have a great night :)
Posted by
Unknown on Thursday, May 26, 2011
Hi guys, today is another gloomy day here in the Netherlands so I've got pictures for you from the vault. This is a mummy mani I did a little while ago, I used China Glaze Sea Spray for the base color and LA girl Matte Blue Twilight on top. Matte Blue Twilight was a delight to work with, the formula was quite smooth for a matt polish, so the lines came out surprisingly crisp. And as you can see I didn't use topcoat, because I wanted to keep the matt/shiny contrast :) Thanks for visiting!
Posted by
Unknown on Sunday, April 24, 2011
Hello guys, happy Easter! Last post I showed you a gorgeous muted green,
#82 from Hema. The formula was quite disappointing but the pretty color makes up for that. Though the color isn't a true mint, 'mint' formed such a nice alliteration with 'mummy' :) And the color matches very nicely with Catrice's I Sea You!, so I used that on top of it, using the mummy tape pattern. These pictures were taken a little while ago, but since they're so appropriate for Easter, I waited till today to show you guys. So for today an Easter mummy, in soft, dusty green. Hope you like it!
Posted by
Unknown on Saturday, April 23, 2011
Hello everyone! I'm still hooked on the mummy, so for today I have a bold pink and black one to share with you. The pink is OPI Don't Know... Beets Me! Unfortunately it was a bit disappointing, I applied three coats and in some light there's still VNL, the formula is pretty okay though, as is the drying time. I used Color Club's Where's The Soiree? on top and boy, I love this black so much! The formula is perfect and it covers with just one thin coat, so very nice for tape manis! Thanks for stopping by :)
Posted by
Unknown on Sunday, April 17, 2011
Hello dear readers and new followers! Just a quick post for today. You might recognize this mani from my
mummy mani tutorial. I used OPI Suzi Says Feng Shui as base color and the metallic blue on top is China Glaze Adore. On its own, Adore can leave brush strokes at times, but it's great for tape manis and opaque in a single coat. Yay for one-coaters! :) So if you like this tape mani and want to create it yourself, just check out the tutorial
here, if you haven't seen it yet.
Talk to you later :)
Posted by
Unknown on Wednesday, April 13, 2011
Hi everyone, my second tutorial! This time it's another simple, easy-to-achieve look: the mummy pattern. The mummy tape pattern is basically just placing tape strips of any size underneath each other, preferably a bit diagonally. This creates a funky design which looks a lot like wrapping ribbons, hence 'mummy'. So the good thing about this look is that you don't have to be precise in cutting your strips or placing them, but also it's perfect if you want to keep that lovely shade that's grown out or has tipwear.

So start with the base color you like (if necessary with a basecoat underneath) and let it completely dry. This can be one that's yet to be applied or one you're already wearing.
On the picture I'm wearing OPI Suzi Says Feng Shui that I applied the day before I shot this picture, as you can see there's a tiny bit of tipwear.
Now take a little piece of tape and cut it in strips lengthwise. You can make very wide strips, or thin ones, parallel or divergent, just cut a bunch of each to create a playful design.
After you're done, place the strips one by one on the nail, each time using a different size or shape. You can leave space between two strips for a continuous stripe, or let them touch each other slightly at the side of your nail to create triangles.
To solve the outgrow or tipwear of your old mani, leave those parts uncovered like I do on the picture. Later they'll be revarnished, which will make them disappear. This trick will also work with VNL! Just leave your tips uncovered.

Then apply your top color and remove the tape strips as soon as possible, do these things at one nail at a time to prevent the top color from sticking to the tape, otherwise it could get peeled off when removing the strips.
And if you plan to cover up the worn-out spots of your old mani, I'd recommend to use an even more opaque top color, or the spots will still be visible.
Finally apply some topcoat, clean up, et voilà!
Finally some useful tips:
- For my tape manis, all I use is regular stationery tape. But you might prefer something else, so just experiment with different sorts of tape to figure out what works best for you.
- For your base color you can use any polish you like, however one-coaters will allow you to place the tape much sooner because those are usually fast drying. Of course you can also quicken the drying of polishes that require several coats to cover, by applying a fast drying topcoat. (I use Seche Vite).
- Your layering color(s) can be either a one- or two-coater. Because you've already applied a base color, most polishes that usually take two coats to cover now will do with one.
- Though I mention cutting the tape strips as step 2, I admit it is safer to cut before applying the base color. However, if you've learned how to cut the tape without having it touch your polished nails, it can save you a lot of time.
- You might want to leave the cut strips somewhere else than the edge of your desk/table, to prevent them from getting stuck to the surface while you're busy. You do not want to have to peel them off with your freshly painted claws!
- Apply your top color in one thin (but opaque) coat, this will create crisper lines.
- When you're removing the tape strips, try to remove them individually, if you can, because most of the time your design will come out neater this way
- Using tweezers to remove the tape strips can prevent your freshly painted nails from getting smudged.
- It's not always necessary to start all over if you've messed up your design, often a little touch-up with a nailart brush can solve the problem.
- If you want to use a matte topcoat, use a regular one underneath. My experience with matte topcoats is that they smudge the design very easily, even when it's completely dry. Applying a normal topcoat first will prevent that.
- Moisterize your cuticles afterwards, because the tape can really dry out your skin!
- You can practice this tutorial on your old mani that you applied a day (or more) before. If you succeed, you've got yourself a fresh mani, otherwise you were going to remove it anyway!
- If you feel like this design is too time-consuming for a full mani, you can also use it for an accent nail (or two).
- Have fun and practice makes perfect ;)
I would absolutely love to see your attempt on my design, so feel free to leave a link to your creation in the comment section!
Polishes I used in this post are OPI Suzi Says Feng Shui and China Glaze Adore.
Posted by
Unknown on Thursday, April 7, 2011
Hello everyone! This afternoon I've posted the
Black mummy mani, which I loved the way it was but I just couldn't resist to give it some magic! So I layered it with Last Friday Night from the OPI Katy Perry collection. And I know it would've been great if it, when applied on the nail, looked just like the bottle color. And I know that that's not the case, because it's so sheer. But that does mean you can layer with it! Which gives you a million more possibilities, isn't that sweet? :) Good night!
 |
| Close-up! |
Posted by
Unknown
Hi guys, good afternoon. For this tape mani I used a tape pattern that you're probably already familiar with by now. I can't get enough of it! And today I called it 'Black mummy' because it looks like the grey parts are wrapped around my black nails. However I applied the grey first, not the black.
So this time I used Color Club Snakeskin as my base color and it's such a pretty polish! And very unique, I must say. It's a steel grey shimmer with gold particles, from the 2010 Untamed Luxery Collection - Diamonds. On top I used my new fave black creme: Color Club Where's the soiree? And as you can see I didn't use any topcoat to make everything shiny. I just really loved the way it was, it's got this tough thing going on, you know? Lol. Thanks for reading again and have a great day :)
 |
Color Club - Snakeskin
'Click me, I'm huge!' |
Posted by
Unknown on Wednesday, April 6, 2011
Obviously not intentionally, considering Tigger's stripes aren't teal-cloured with glitters, (how weird would that be?!) But that tape pattern (same as
Time to rock!) with that base color just looks an awfully lot like him, don't you agree? Oh well, on to the polishes! The orange is Life Preserver from China Glaze's Anchors Away collection, I normally don't have a thing for oranges but this one's so pretty! It's slightly muted :) On top of the tape strips I used Trust In Fasion, and immediately after that Choose Me! Both from Essence. Choose Me! is the Essence dupe of OPI Catch Me In Your Net, Orly Halley's Comet and Zoya Charla. On its own it's a tad sheer and more blue based, but it forms a perfect pair with Trust In Fashion.
Thanks for reading!
Posted by
Unknown on Sunday, April 3, 2011
Hello guys! Recently I purchased a new black creme: Color Club's Where's The Soiree. And I absolutely love it! The formula is just perfect and it's a one-coater :) My old blacks were either runny or goopy and nameless... So finally I've found a great black creme.
However it did dry quite matte, not what I expected, but instead of seeing it as a con, why not take advantage of it? I used the same tape pattern as the mani from
Time To rock! and added a layer of clear polish. Because of the thick top-layer, the surface obtained a subtle relief which - combined with the mixture of glossy and matte finishes - gives the whole that bit of extra spice it needed.
What are your toughts? And as always, thanks for reading :)
Posted by
Unknown on Friday, April 1, 2011

Good evening, y'all! Today I have another tape mani for you! (Anyone getting tired of them already? Lol.)
The base color I used is China Glaze Designer Satin, a lovely dark magenta. On top I applied It's Time To Rock from Sephora. I purchased it yesterday and I'm so glad I did because it's one of my favorite polishes already! It's Time To Rock is a multichrome foil, with a dark silver base and depending on the light it has hints of blue and pinkish purple and every shade between that. The picture below isn't completely color accurate but it's the best I could do.
Another thing I love is the tape pattern, which is so simple to create. All you need to do is cut tape strips in random sizes and apply them randomly underneath each other on the nail. So it's almost as effortless as the
laser mani, but even more because you don't have overlapping strips therefore little to no chance of messing up. Guaranteed win! So I'll be doing this design more often :)
And as you can see, I didn't apply topcoat, but I kind of like the uneven surface, it actually makes the design quite playful. Thank you for reading!
 |
| Sephora - It's Time To Rock |