Showing posts with label kiss nail art. Show all posts

Amandlandish Guest Post

Posted by Unknown on Thursday, February 9, 2012

I recently did a guest post for my friend Amanda! You can check it out here.
"Hi Amandalandish inhabitants! I'd like to share with you a tutorial for an accent nail that looks more complicated than it really is. If you really wanted to blow people's minds you could do each nail with this pattern! I'll break it down so you can see each step. The only secret is to use polishes that are opaque in one coat, and fairly fast drying."
 I started with Barielle Grape Escape. I used 2 coats.
 Pick an accent nail. Make sure it's dry.
 Then I used a black striper polish to do a line down each side and fill out to the edge.

Then I used 1 coat of Barielle A Bouquet for Ava to divide the middle purple section in half. Use a small paintbrush, or if the previous steps are completely dry you can mask off the area with scotch tape.

Then I used the same black striper polish to do the following lines across the middle section.

Same thing for these lines.

Then I used a medium sized dotting tool to add these dots of Barielle Sweet Addiction. Just go down the middle dividing line between the teal and purple sections.

Then I made triangles along the black sections. This wasn't that hard. I just used my smallest dotting tool and basically did 3 dots close together. They don't have to be perfect triangles just yet.
 These light teal dots are made using Barielle Sweet Addiction.

 Repeat the same 3 dots close together to make some light purple triangles. I used Barielle Expressive.

Same thing for yellow triangles. I used China Glaze Lemon Fizz.

At this point my triangles did not have sharp corners, so I took my black striper polish to straighten the sides of each triangle. That perfected them.

Wait until your nail art is dry (give it 10 minutes to be safe) and apply a layer of topcoat. This will help to smooth it out and last longer! If you apply the topcoat too soon, you risk smudging the art. That would not be good after all the time it took.
 Here are all of the polishes I used: Barielle Grape Escape, A Bouquet for Ava, Expressive, Sweet Addiction, China Glaze Lemon Fizz, & Kiss Nail Art striper in black.

So there you have it! It's a lot of little steps, but once you break it down.... each step is not too difficult. With patience you can recreate it! The benefit of using fast drying/one coater nail polishes, is that the layers will not be too thick and difficult. If each step were done with a thick gloopy coat of nail polish, it would NEVER dry! So the secret is to be thin. 
"Thanks for inviting me Amanda! And thank you to all of you followers that read this! Come and see me sometime. ;)"
More aboutAmandlandish Guest Post

Mira + simple nail art

Posted by Unknown on Wednesday, December 14, 2011

This is a quick post. Sorry, but I've gotta run and don't have much to say anyway. This was 2 coats of Zoya Mira followed by some quick swipes of a nail art striper brush in black. Then I took Color Club Scent-scuous Sugar Plum Yum and fished out the big purple glitter and placed it on with a toothpick. :) No, it didn't smell because I added such a tiny amount... I wanted to try this way of using the giant Color Club glitters because they can sometimes be difficult to brush on like normal nail polish. I think it was successful!

Be sure and come back tomorrow morning for an exciting new series in nail art!
More aboutMira + simple nail art

Explosions

Posted by Unknown on Monday, December 12, 2011

I recently found Algae Veronica of lotsafingerpaints.tumblr.com She was the winner of Miss Piggy week in the OPI Muppets Facebook Contest. She is phenomenal! I'm jealous of the artistic flair she manages to work into every design. She's even done other cartoons! Her Little Mermaid is to die for! 

This look was directly inspired by a look she did here.

It was really easy to create too! Follow these general steps. Paint some nails black and some white.

White zigzags on the black nails. (I used a nail art striper polish)

Black zigzags on the white nails. (Again, I used a nail art striper)

Then I added silver zigzags and neon purple/pink zigzags with more nail art stripers. Topcoat!

The entire look can be created with nail art stripers! No real special tools needed. I got the 3 bottles on the right as a set. The neon is from Sinful Colors and it's Sour Grapes.

More aboutExplosions

Glitter Tips

Posted by Unknown on Wednesday, November 23, 2011

Please take a moment to check out the great entries to OPI's Mani Madness Contest on Facebook. This week's theme is Fozzie. If you like my look, drop me a vote! I'd be eternally grateful!
Check out mine here!

I actually painted these at work one night.... Yeah, there were only 2 patients at our small hospital that night and I had one other nurse to keep me company..... So we watched TV and I painted our nails in the down time while the patients slept. Have I mentioned before just how much I love my job?

I used OPI Swimsuit...Nailed It!
Angled tips were Wet N Wild Ice Baby Cost Is No Issue
Kiss Nail Art striper in black for the zebra print


I didn't get a pic of my co-worker's nails... but I used Nubar Reclaim and GOSH Holographic to freehand some leopard spots. They were pretty awesome.
More aboutGlitter Tips

Blogger Challenge - Day 2 - Sneakers

Posted by Unknown on Tuesday, October 25, 2011

Nine of us bloggers from all over the world have agreed to this challenge initiated by Caroline @ GoodLackNail. It was her idea for us all to post for one week straight using the same pink polish (of our choice from our own stash) in a different way each day. Layer it, stamp it, freehand over it, but you must use the same pink in each manicure. I thought it would be a great to participate and see so many ideas for pink manicures that coincide with Breast Cancer Awareness Month! At the end of the week our looks will be judged by Vampy Varnish to determine which was each of our best!

Who is participating?
1.Deniz from Emerald Sparkled is using Flor Mar #29 (Istanbul, Turkey)
2.Caroline from Good Lack Nail is using OPI Do you think I'm Tex-y? (Vienna, Austria)
3.ME! Leslie from Nail Polish Art Addiction is using China Glaze Laced Up (Louisiana USA)
4.Inge from Polish Sis is using Hema nr 84 (Utrecht, Netherlands)
5.Rebecca from Rebecca Likes Nails is using Color Club Peppermint Twist (Newfoundland, Canada)
6.Ulmiel from Did Someone Say Nail Polish? is using Finger Paints Give Pink A Chance (Ljubljana, Slovenia)
7.Gejba from Parokeets is using Essence Love This City ( Ljubljana, Slovenia)
8.Sidrah from Beauteous Blog (Country: Karachi, Pakistan)
9.Sarah from facfacebook.com/LuckyLacquers is using W7 Shocking Pink (Phoenix, AZ USA

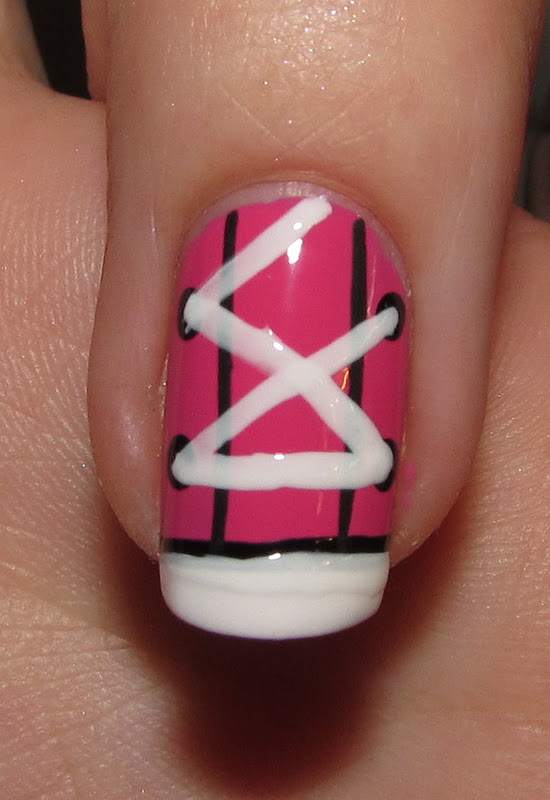
This is the look I came up with for Day 2. How fitting to do sneakers with a polish from the "Custom Kicks" Collection that's named "Laced Up!" I know it's very pun-ny but that's the whole point! Lol
I've seen several designs like this floating around. I'm in no way claiming this is my original design, but I didn't copy any one person's specific manicure.

It is really easy to do! Paint enitre nail pink and add a white french tip. Add a tiny black striper polish line where they meet.

Draw two tiny lines going up the nail like so:

Add dots evenly spaced on the outside of the lines. I was able to have 3 rows of dots on my thumb, but could only fit 2 rows on my other nails.

Start lacing your shoe with some a white nail art striper.


 Add a topcoat and you're done!

Keep coming back for more on this Blogger Challenge!
More aboutBlogger Challenge - Day 2 - Sneakers

Tribal - Take Two

Posted by Unknown on Wednesday, October 5, 2011

Taking another stab at tribal print. This time I copied a look I found on Pinterest. Noted: originally done by SuPa Nails. (This time I kept the link!)
This is the inspiration look. Yes, I just copied it almost exactly. They left more orange showing on the index finger and I actually like that more.

The polishes I used:
Sally Hansen Xtreme Wear - Sun Kissed
Sally Hansen Insta Dri - Lightening
China Glaze - Bahamian Blues
Kiss Nail Art Striper in black and white.

Paint all nails Sun Kissed. It took two coats for opacity.

Thumb design: Start with a black "V" over the half moon.

Add a thin line of Lightening along the underside of the "V"

Add thin white stripes along the black "V"

Bahamian Blue dots along the top of the black "V"

The ring finger design is the same as the thumb except leave out the white stripes.

Index finger - paint half with white polish.

Add thin black lines down the length of the nail.

Use a striper brush and do a line of Bahamian Blues along the side of the white edge.

Add a thin line of Lightening along side the blue line.

Topcoat and see what you think!

More aboutTribal - Take Two

Going Tribal

Posted by Unknown on Saturday, October 1, 2011

This was my first attempt at the tribal print that is so hot lately. I got some inspiration from these nails seen here. I'm not sure what the original source is.
I like the way they turned out, but they also remind me of Easter eggs to a certain extent.

Here are the step by step pictures for anyone interested in recreating a look like this.

I started with a regular base coat, then freehanded China Glaze Refresh Mint leaving naked half moons. I started using the hole reinforcement stickers, but I realized it was taking me far too long and the lines weren't really that clean. I knew I would be lining the edge later, so I changed to freehanding.

Kiss Nail Art Striper in black to freehand some black french tips.

Kiss Nail Art Striper in white to line the half moons and to do a line a smidge beneath the french tip.

Then I took my Kiss Nail Art Pen in black to draw a zig zag line across the middle portion of the nail.

Kiss Nail Art Pen in black to do tiny dots along the zig zag.

A few tiny white dots in the naked half moon space. I used Kiss Nail Art Pen in white.

Kiss Nail Art Striper in white to zig zag along the french tip.

Kiss Nail Art Pen in white to do dots along that zig zag.

There you have it, just add a topcoat to smooth everything out and protect your work. I managed to get these done as a full mani in about an hour's time. If I had been willing to leave plenty of dry time between the steps, I'm sure it would have been a lot neater. I'm happy with them.

I realize this is probably too busy for some people's taste, but I like to be crazy on occasion. :)

More aboutGoing Tribal