Showing posts with label tape. Show all posts

Coral-Reefined with Striping Tape

Posted by Unknown on Friday, June 15, 2012

I wanted to play more with the striping tape I received from Born Pretty. This time I used the silver tape and did accent nails with horizontal stripes down the entire length of the nail. It was very tedious, but totally worth it!

The polish I used is Coral Reef-ined from the Balm's line of "Hot Ticket" nail polish.
I picked it up on Hautelook last month for $5.

I switched up what nails were the accents on each hand.

This was my first Balm nail polish to try and I was really impressed. The formula was great! 2 easy coats and the coverage is perfect and self levels to this. :)


The striping tape did start to lift at the edges after 8 hours or so. I lost a few pieces of tape, they just curled up and came off. (Despite the fact that I had put a layer of Seche Vite over the accent nails) Every couple of hours a new piece of tape would come off, but I just keep going about my business. After 24 hours of wear-time, all of my tape was gone. Either it had curled up and off, or I picked at it and peeled it off. I can't seem to get striping tape to last too long. Does anyone else have similar issues?
More aboutCoral-Reefined with Striping Tape

Born Pretty Store - Striping Tape - Design & Review

Posted by Unknown on Thursday, May 31, 2012

Reviewing another product from the Born Pretty Store. This time it's the Striping Tape you can find here in a pack of 12 different colors for $6.29. I've recently seen a lot of new nail art looks that are featuring striping tape, so I was excited to try it myself. 
I wanted to recreate this look in particular. Her's was much neater and better photographed, but this isn't a contest, right? Enjoy.
I used the gold striping tape from Born Pretty. The polishes I used were Sally Hansen Lavender Cloud, China Glaze For Audrey, and Essie Navigate Her.


As far as a review goes.... The tape was very easy to use. Same concept as using Scotch Tape on your nails, but without the pain of having to cut it into tiny strips. I just cut off a small section big enough that it would over lap the edge of my nail. Then I came in close with a pair of cuticle nippers to cut it exactly to the edge. The tape adheres well and lies flat under top coat. I didn't have any trouble until day 2 of my manicure when the topcoat had worn off some and the edges of the tape were exposed and started getting caught on everything.
I also got some Bullion Beads from Born Pretty, that's coming up next!
And you can get 10% off by using my coupon code!

More aboutBorn Pretty Store - Striping Tape - Design & Review

glad in plaid!

Posted by Unknown on Sunday, May 20, 2012

Good afternoon darlings!

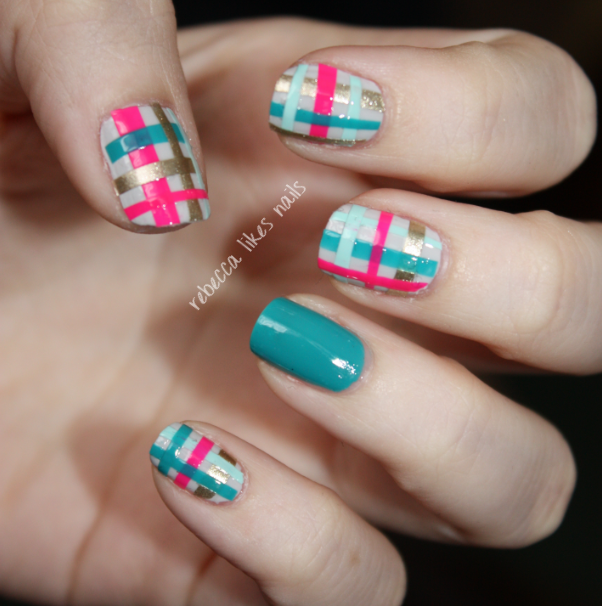
Today I have a really fun tape technique to show you. Instead of using tape to create relief patterns, you use the tape to make your own nail stickers!
I saw this cool mani on The Beauty Department, which is a really fun site that I am guilty of stalking.


Can you spot the tape? Haha! The trick is to paint some tape, let it dry, and cut it into shapes to put onto your nails. It helps you create super even and straight lines, which is a good thing for me because I am awful with a striper brush.


I broke up the intensity of the plaid with a solid accent nail, which I think looks pretty cute!


I took a whole bunch of pictures of this mani because I was really proud of it!

It can be kind of difficult to cut the tape into small pieces so take your time, and then once on the nail, use cuticle nippers to clip the edges. I also used a file to smooth the edge of my nail a little, to stop the tape from hitching.


The polishes I used are:
Urban Decay - Superfreak (gold)
Urban Decay - Woodstock (pink)
OPI - Fly (teal)
Essence - You Belong To Me (light blue/green)
The base color is a light gray franken I made.

What do you guys think of this fun way to use tape? I think I'll definitely be trying it again!
More aboutglad in plaid!

tons of tape manis

Posted by Unknown on Thursday, April 26, 2012

[This post worries me a little - I won't have access to a computer on the day that this one is scheduled to post so if anything is wonky, I won't be able to fix it! I'm sorry in advance if there are any issues... Haha!]

Do you recall last week when me and all my best buds did water marble manis on the same day? Well this week, we decided to do tape manis!

I'm super proud of mine so I've got a ton of pictures of it for your viewing pleasure.


Tada! This mani took a lot of patience but I think the result is totally worth it!


To create these tiny, perfect stripes, I used striping tape!
You can get like 12 rolls of striping tape on eBay for less than 2 dollars.

There are two ways to use striping tape - you can actually use the tape itself in the mani, creating lines.
Or you can use the tape for relief patterns like this one, where you lay down the tape, paint over it, and remove it to reveal the pattern.


This is how my nails looked before I did the striping. I loved it like this too!
To create this look, I used the new plastic-wrap-sponging I'm seeing around but I used a tissue instead of saran wrap (because I was too lazy to go find some!)
Basically, what you do is paint your nails in one color and let it dry completely. I used Color Club Twiggie.
Then, you paint over it with your second color and quickly dab some of it off with plastic wrap or a tissue that you've rolled into a ball or just scrunched up in your hand. I used Color Club Warhol.
It will remove random sections of the top polish, revealing the base color! You dab around a few times until you're happy with the result.


Here's the various stages of this mani. Do you like how my striping tape matches the OPI cosmetic bag in the background of this photo? Haha!

Placing all the striping tape was time consuming but I just love the small stripes!
(The one larger stripe on my index finger totally hurts my OCD though. Heh.)
I used Color Club Where's The Soiree for the black layer.


I'm so stinkin' happy with how this turned out, and I can't wait to try more striping tape manis!


More abouttons of tape manis

as seen on... Chalkboard Nails

Posted by Unknown on Tuesday, April 24, 2012

Bonjour! Today's scheduled post is probably my favorite out of all the ones I've got planned this week, because I love the nails and I love the girl behind them.

I'm sure you all know Sarah from Chalkboard Nails. If you don't, you must be living under a nail-art-rock because she is insanely popular nowadays!
I'm pretty lucky because Sarah is my homegirl.
Even though our timezones are 5.5 hours apart, we still find time to chat every day and we're pretty much in love, I think. We also like to make fun of each other. It's a pretty good relationship.

Of course I had to recreate one of Sarah's manis, or else she'd probably think she's too good for me. And we can't have that.


Not only did I recreate her nails but I've stolen her hand poses and her watermark. Take that!


I get a kick out of these photos. Plus the nails are totally badass!


A little while ago, Sarah did these nails for a collaboration with the blog What I Wore. I love them a whooooole lot. Enough to spend an hour doing the four striped nails. (I did both hands!)

This is the mani I chose to wear on my vacation so I'm still wearing this as we speak! Hopefully it will last me through most of my trip. (Don't worry, I packed my Nail Envy and Seche Vite for a mid-vacation mani change with some new polish I will surely buy!)


The base color of the leopard nails is Sephora by OPI - XOX Betsey.
The center of the leopard dots is Color Club - Love 'Em Leave 'Em.
For the white, I used Sally Hansen - Whirlwind White and the black is Essence - Black is Back.
I did the leopard print with a dotting tool.

I've found lately that the Essence polish works nicely for nail art because it doesn't dry as quickly when you're using it for dots and stuff and it isn't so much of a nightmare to clean up!


I used striping tape for the stripes, painting white first, and then adding the tape and painting over it before removing the tape. The thumbs came out perfectly but sadly I had some issues with the ring fingers.
Nobody bats 1000, right?


Tada! I'm in love with this mani and I'm pretty sure I'm going to get a ton of compliments on it.

Thank you Sarah for the great idea and thanks for bein' my bestie. 
B-face.
More aboutas seen on... Chalkboard Nails

i have a chevron problem

Posted by Unknown on Wednesday, April 4, 2012

Morning everyone!

Today I'm gonna take a break from showing European polishes and I'm gonna show you a nice OPI from their most recent collection, and the nail art that I did when I wore it.

I'll pre-warn you - I had the cold from hell when I wore this mani and I think it screwed up my camera talent. Haha! My skin is totally washed out in some of them and in another I've got serious tipwear. They're still nice but I'm just picky.


OPI - I Have A Herring ProblemSo far I've only picked up 2 polishes from the Holland Collection and this is one of 'em! I love this dusty blue with the awesome silver shimmer.


This kind of shimmer is my fave. It's more textured looking than other kinds of shimmer and I think the effect is really cool.

When I was wearing this polish, I decided I wanted to try out a chevron mani, like this one from Jane of Nailside.


I loved how chic this looked!
The trick to getting the perfect lines is using scotch tape to create the triangles.
I used the same 2 pieces of tape on all nails to make sure the angle of the chevron was exactly the same. (You just have to wipe the tape off between uses!)

The first color I used was OPI - Suzi Skiis In The Pyrenees Suede, a lovely shimmery gray matte/suede polish. I then used a small brush to freehand the black pieces with Wet N Wild - Black Creme. You could use tape for the third color but I didn't want to risk ruining it, so I just did it freehand.
I added topcoat to make the whole thing shiny and there you have it!


I only got one good picture of this manicure before ruining it at my job, and I needed more than one picture so here is my tipwear. Haha! It's not so bad.
I really wanna try this again with bright colors!

That's all for today ladies (and gents?)!
More abouti have a chevron problem

chic glitter triangles

Posted by Unknown on Tuesday, February 28, 2012

Good morning all! Today I have a really simple and chic mani to show you, using two of my favorite polishes.


I saw this mani on a french blog called Pshiiit and I knew I had to try it because I fell in love with the little glitter triangles.
I don't have the polishes from the original post so I had to improvise and I really like the contrast in the colors I chose.


The base color is Color Club - Nomadic In Nude, and I painted on the triangles in Orly - Bubbly Bombshell with the help of some tape.

Bubbly Bombshell is one of my favorite glitters in my stash. The color is so happy and bright!


I really liked wearing this mani because it was easy but looked really great. I wish my triangles had been a little neater but that's hard when you're working with glitter!

This post reminds me of my "As Seen On" series that I did last summer while I was on vacation.
I'm going away again twice this year - in April and in May - should I do another As Seen On series? If you guys enjoyed those posts, I'll start brainstorming which ones to do this time around! (And if you've done a mani you think I should recreate, send it to me!)
More aboutchic glitter triangles

double lightning bolt success!

Posted by Unknown on Wednesday, August 3, 2011

Good morning!
Today I have some nail art for you. Awesome nail art.

A lot of you probably already know about the blog Nailside.
Jane is lovely and does some RIDICULOUSLY good tape manis.
She posts something that blows my mind almost every day.

You might remember I tried the Double Lightning Bolt before, here.
I tried a second time with no photographic evidence.

Well, Jane, the third time was the charm.


Yup. I did it.


(Yes I am holding my franken, there was no other bottles near me when I took pictures!)

I started my lightning bolt mani with the polish I was already wearing, Essence - Movie Star. (This was the base of my recent Born Pretty mani, I removed the rhinestones and covered the stamping with the bolts.)
I find it impossible to do a tape mani unless my base color is at least a few hours old. If it is fresh I always screw it up.

I did my first taped section with China Glaze - DV8. Most holos dry really quickly so you can tape over them almost right away!
And the second taped section was done with Wet N Wild Black Creme.
Thick coat of Seche Vite, and it's finished!


I love this look so much and I'm so happy that I managed to do it right, finally!

Thanks for the inspiration, Jane! Now I need to try and do some of your other amazing tape manis.
(Hopefully they all won't take 3 attempts.)
More aboutdouble lightning bolt success!

what's with the cattitude? + tape mani

Posted by Unknown on Friday, June 17, 2011

Good afternooooooon, followers. All 870 of you (and more I'm sure who don't follow via GFC.) I can't believe so many people have joined my blog. I love each and every one of you! Thank you!
1000 will be coming up soon, I guess I have to start planning another giveaway! Haha.
In the meantime though, have you entered my current giveaway? It ends tomorrow night!!
And remember, all people who like my facebook get another entry ;)

On to today's post.
I've been doing so many swatches lately for my project that I have been neglecting my nail art posts. To be honest, I haven't had much inspiration lately and I am guilty of just wearing plain colors with no art almost all the time this past month.
I'm going to try to get back into the habit of nail art though, because I really hate that I've lost the drive to do it.

So the art I'm going to show you today is simple but I really liked wearing it.
Sadly the pictures don't really do it justice!


The pretty middle polish just didn't want to show up nicely so I took some photos from strange angles and with strange lights to try and capture it.


To create this "funky french" I added a piece of tape to a day-old manicure of OPI's What's With The Cattitude? and then painted on the second color, which is Essence's Choose Me!


And then I very carefully freehanded the black tip with Wet N Wild Black Creme.


This was so fun to wear, and I didn't want to take it off.
I really like this tip, it's like... a check mark, or something. I don't know what to call it.


And that's What's With The Cattitude? on it's own.
I wanted this polish for a long time and finally found it, only to realize that it is an exact dupe of China Glaze's Bahamian Blues.


Joe Fresh Powder Blue, China Glaze Bahamian Blues, OPI What's With The Cattitude?

So I really didn't need WWTC, especially considering BB is almost a one coater and WWTC takes 3.

Not to mention that WWTC was one of only THREE polishes I have bought for myself in June, so it was a bummer that one of the few polishes I let myself buy ended up being unnecessary.
Oh well. My Bahamian Blues is a mini so I guess I can deal with having a dupe :P

I was going to go work out after I finished this post but my lunch kinda made me feel sick, so I'm going to do some nail art instead. :)
Have a lovely day! See you tomorrow with some European polish swatch spam!
More aboutwhat's with the cattitude? + tape mani