Home » Posts filed under White
Posted by
Unknown on Monday, June 11, 2012
Hello dear readers! I'm still very busy with school, only two more weeks to go! I've still got a lot of things to do, but right now I just want to show you these nails. :-) Yesterday I wore a brandless plain white creme. It took three coats to get opaque and it took forever to dry, but it was totally worth it. Who knew I could like white nails this much! But sadly the polish already chipped after one short day, so today I added these
lightning bolt tips with Essence Viva La Green. I hadn't done lightning bolt tips for a long time, I almost forgot how fun they are to make. ^^ Finally I added a bit of glam with OPI Spark The Triomphe. It's so sparkly!
♥
Posted by
Unknown on Sunday, May 13, 2012
Sation bottles are oval with thick glass bottoms. The new brushes are great for ladies like me that love wide brushes. The formula on all the ones I've tried is excellent. You can purchase
Sation's Big 3 Free polishes at their website.Sation Snow White is a pure white creme polish with a pretty good formula. Three coats, not too streaky & definitely not goopy like most white creme polishes. I don't wear straight up white cremes alone but they are a must have for nail art. Sation Snow White is a great option.
 |
| Hilarious postcard I found from the '60s. |
Thanks for reading!
April
This polish was sent to me for review. All opinions are my own & were not influenced by Sation! For more information you can read my disclosure policy.
Posted by
Unknown
Hello everyone! And happy Mother's Day to all the mommies out there. :-) Yesterday I already showed you my
tribal accent nail. And as much as I liked it, I couldn't stop wondering how a full mani with the black and white pattern would look, et voilà! ^^ I had a lot of fun working on it and I can't wait to do it again in different colors, any color schemes you suggest?
Posted by
Unknown on Saturday, May 12, 2012
Oooh, more tribal nails! I hope you don't mind. :-) I just love how detailed it looks with only little effort, especially if you use it for an accent nail only. Also it's a cute eyecatcher that way and a great excuse for being lazy, haha. The tribal print was freehanded with a white striper polish over black and the purple is OPI's Planks A Lot. Thanks for stopping by!
Posted by
Unknown on Wednesday, May 2, 2012
Hello everyone, here's my belated Queen's Day post! On this national holiday everybody wears orange and sometimes with hints of the Dutch flag, so that's exactly what I did here. I started with the orange and then layered the red, white and blue on top, using tape for crisp lines. This mani took forever to make as I had to wait three times in between for my polish to dry before I could place the tape on my nails, but it was definitely worth it and I received many compliments on it that day. ^^
To show our country a little love on days like these, the Dutch brand Koh set up a little collection with 'Dutch' colors which I've used for my Queen's Day mani. Below are swatches of each polish.
Brilliant Red!. This is a classic red jelly with a hint of orange, it's very pretty and bright but not unique. It does have a great formula and application, like I'm used to from most jellies. This was two coats, and as you can see it still shows a tiny bit of VNL but strangely it doesn't bother me much in this case.
Crystal!. This was my second favorite polish from these four (and the only one I didn't include in my mani because it was too sheer). I honestly expected to hate it as it's a frosty white which looks very dated to me, but I ended up loving it! When you think of frosts, you think of brushstrokes, but fortunately Crystal! doesn't suffer from those with its easy application. :) It takes three coats to get full opacity, but it's totally worth it in my opinion. And I know it's not even summer yet, but Crystal! would be a great color for winter too, look at that pearly shimmer! I already start to feel Christmassy when I look at it haha.
Rock Chick!, my favorite from the bunch. ^^ This cobalt beauty is so bright that it looks like a neon in certain lighting, really gorgeous... And like Brilliant Red! this is a jelly with a perfect, rich formula. It covers perfectly in two smooth coats, love it!
And the last one is Dutch!. Like many other girls, I'm not a big orange fan when it comes to nail polish. But it is the perfect orange for Queen's Day or to show our team some support during the UEFA European Football Championship this summer! Pictured is three coats, once again the application was very nice.
Thanks for reading!
The products in this post were sent to me for review.
Posted by
Unknown on Friday, April 6, 2012
Hi everybody! For this post I have a broken heart for you. Nothing to worry about though, I just thought it would be a cool design as I'm still experimenting with sheer polishes. :) I used my vertical
lightning bolt design, then I painted the heart on top with a stencil I made from tape (like I used in this
mani). I'm not sure if I like the colors I used, but I'm glad the idea I had in mind came out pretty much the way I wanted, yay! Thanks for reading! :)
Polishes I used:
H&M - Bella's Choice
Essence - Stamp Me! White
Color Club - Warhol
Posted by
Unknown on Friday, December 9, 2011


Hi everyone :) For this post I have another Christmas mani. Since I haven't made any Halloween looks this fall, I'm planning on catching up some holiday manis with this year's Christmas ;-) Anyway, this week's been terribly busy, so I've been wearing Essie Your Hut Or Mine for the last three days. But today's weekend, yay! So I finally had time to update my mani. I added a Christmas tree for my accent nail, using tape. You know, if you think about it, a Christmas tree isn't that different from a
lightning bolt! I mainly used tape triangles which I placed underneath each other on each side of the tree to create the zigzag lines. For a little sparkle I added silver glitter on top and a larger piece of glitter as my tree topper. On the rest of my nails I made "
funky clouds", representing a snow scenery and later I added the "snow" with a dotting tool. In retrospect, I think the dots are a bit too much, so I doubt if I'm going to keep this mani longer than a day. But oh well, that means I can do my nails again tomorrow ^^ Thanks for reading!
Essie - Your Hut Or Mine
Essie - Lion Around
Orly - Pure Porcelain
H&M - Confetti Kisses
Posted by
Unknown on Monday, December 5, 2011
Hi guys! These lacy nails were made recently when I was in a very Christmassy and girly mood, can you tell? ^^ I used OPI Big Apple Red and Konad imageplate M71 with Essence Stamp Me White!. This look is a lot girlier than I'm usually going for, but I enjoyed it nonetheless, squealing like a little child when I noticed how they matched red Christmas glasses from the Ikea was part of the fun haha :P
Thanks for stopping by!
Posted by
Unknown on Wednesday, November 30, 2011
NFUOh not only does really cool flakies, but they actually do some really nice other finishes too.
I picked out these three shades to try NFUOh 073 over:
Top to bottom: Essie Marshmallow, OPI Curry Up Don't Be Late and I have a feeling it's China Glaze Platinum Silver.
At first I just tried one coat (obviously) to see how much effect 073 had on the polishes. The frost and pearl finishes didn't let you see much of 073, I think a creme, sheer or jelly is more friendly for this kind of thing.
Here we go on to two coats! 073 over Essie Marshmallow and naked nail were turning out to be my favourites. Although I really loved 073 by itself, I would probably never wear it that way.
The formula of 073 is great, smooth and thin. The only iffy NFUOh formulas I have experienced have been from the more sheer, french colours.
Please enlarge the photos to see the detail! It really is a pretty polish, looks great in all lighting situations too.
Now I don't really know where to buy these in New Zealand but there is a site called
FabulouStreet.com that ships internationally. USA residents can even get free shipping.
Posted by
Unknown on Saturday, November 26, 2011
Hello everyone! I hope you're all doing fine :-) I am, it's just a little hectic right now which is the reason of me posting so little lately. But I've got many new ideas to post once things slow down a bit, including tutorials and perhaps the start of my attempt on the 31 day challenge! I'm so looking forward to it! :)
For this post I'd like to share this birthday mani with you that I made for one of my dear readers. Since I am always occupied with other things that need to be arranged on my own birthdays, and usually just end up with a simple creme or glitter on my nails because of the lack of time, I decided to make something cute that's not too difficult or time-consuming to recreate. My accent nail, is (obviously) a birthday candle! I began with three coats of yellow (M67 by Make-Up Studio, a new brand!). Then I used a pink for the "cake". Once it had dried I added the candle, the little flame and wick, and there you have it :) On the rest of my nails I'm wearing China Glaze For Audrey. I painted the irregular stripes that I'm so into lately, with a white French manicure striper. What I love about those is how opaque most of them are, as opposed to regular white polishes. To complete the party look I added an iridiscent glitter (OPI Last Friday Night), it's sparkly and still reveals the stripe design underneath. And that's basically it! Happy Birthday! ^^

Posted by
Unknown on Thursday, November 3, 2011
Hello everybody :) For today's post I have dice nails to show you. They're made for a reader who requested Katy Perry inspired nails. And the first thing that crossed my mind were her outfits of course! Katy has worn tons of awesome, funny, colorful outfits throughout the years, so plenty of stuff to get inspired by. One of my favorite dresses of her has to be the red sequin dice dress, I love all the glitter and the colors and it's so fabulous Las Vegas! Anyhow, what better polish to wear as the basecolor than good ol' China Glaze Ruby Pumps... One of my all time favorites. It does need three coats to cover, but it's so worth it :) And the formula is great too. I used black and white acrylic paint to freehand the dice. There is a lot going on, but I sure can't pull off that amazing dress, so my last comfort are these nails, lol. What are your thoughts on these Katy Perry's dice dress inspired nails?
Posted by
Unknown on Monday, October 3, 2011
 |
Left Orly Lucky Duck, right OPI Jade Is The New Black
(Completely on the left is Konad Solid Pop Green) |
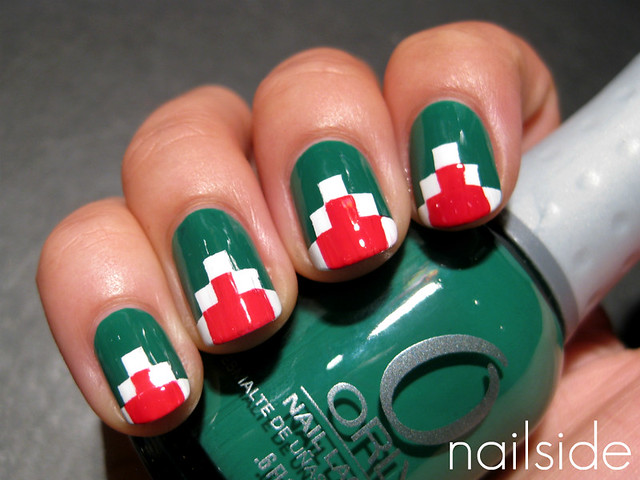
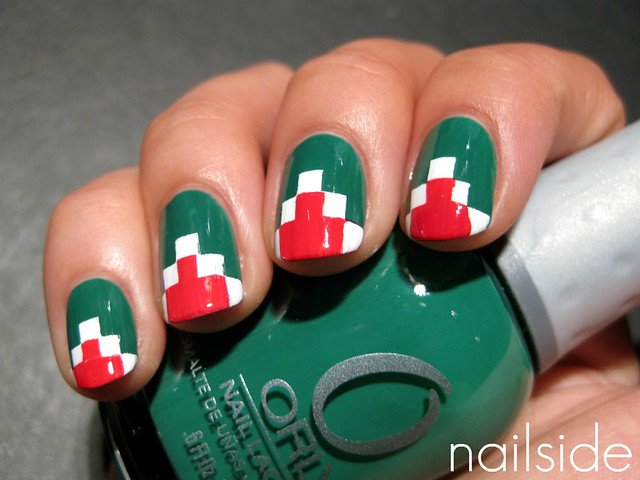
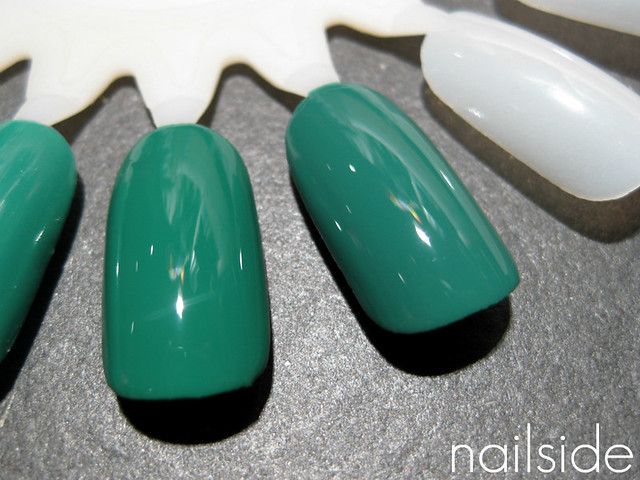
Hello everyone :) Last week I attempted my first aztec nails, or should I say pixel nails? The nice green you see is Orly Lucky Duck, it had an amazing formula, a bit in between a jelly and a creme, which made it very easy to apply. So you'll end up with a glossy and opaque finish after two coats. On the swatches of it online, it looked more turquoise, that's why I loved it so, but in real life it leans a lot more towards green. Still very pretty, though I don't think I needed it, since I now find it very similar to a polish I already had: OPI's Jade Is The New Black. They're not dupes, JITNB is a bit dustier than Lucky Duck as you can see, but still I think they're so similar, that you probably won't need both. They both have a great formula and cover in two coats, also the drying time of the two polishes is pretty good, so the big difference must be in the brush/cap (or price). I like both the rubberized cap of Orly and OPI's Pro Wide Brush, but you might not agree with me ;)
About the nail art, I used tape strips to make the aztec pattern, what else, right? ;) The white is Essence Stamp Me! White and the red is OPI's Big Apple Red. Yes, it took me forever to make, haha, but I'm quite patient when it comes to nail art, so I'd do it all again in a heartbeat. Though using it as an accent nail would be a nice compromise, like the polished perfectionist
AmyGrace did
here. Accent nail FTW, right! She's awesome. And that's it for this post, good night!
Posted by
Unknown on Tuesday, August 30, 2011
I posted a
preview of the Juicy Couture Glitters last week & this is my first full manicure using the Gold Glitter. I started with 3 coats of the gorgeous but difficult
Revlon Powder Puff. Then just one layer of Juicy Couture Gold Glitter, a clear polish with medium hexagon glitter & occasional foil hearts.
Gold Glitter is super easy to apply and I even got a few hearts without having to fish them out. I've always thought that glitters like this were kind of a pain to apply but the application for this one was superb.
I'm not a huge glitter fan and I would never have gotten this for myself, but I really love it! Thanks again to
Midnight Manicures for this prize!

The next night I added a coat of China Glaze Matte Magic.
Thanks for reading!
April
Posted by
Unknown
I recently received Color Club's Fracture collection in the mail! I have already shown you Tattered in Gold but it's nice to see the rest of the collection :D
This collection is Color Club's take on the whole shatter/crackle/fracture/texture trend. A nice colour selection available. Although it seems just about everyone has released a black, silver, white and a few have a gold. OPI has done a blue shatter similar to Splitting Image but this isn't a dupe. I also think Sally Hansen may have released a similar purple.
 |
| Smash Hit, Splitting Image, Clean Break, Kiss & Break-Up |
Before I tried them, I was lucky enough to have a few words from the Wise about how I should apply the Fractures. Apparently he (boyfriend) thinks I apply it too thick and it covers most of the colour underneath. He was disappointed when I painted my nails purple and applied the gold fracture on top only to have the gold dominate.
 |
| Kiss & Break-Up, Clean Break, Splitting Image, Smash Hit |
So I tried to apply them a little bit thinner here, I really like how they turned out. The white especially surprised me! I was a little bit iffy about it at first, but you know that old saying, "don't knock it 'till you try it".
I tried the Fracture polishes over a few shades before I tried them on myself. What I realised is that they don't fracture too well on the nail displays. But it's nice to get an idea what they'd look like over another shade.
Overall, I quite like this little collection. The formulas are nice, not too thick like my OPI Black Shatter tends to be. They fracture quite quickly and give a good coverage.