Showing posts with label Red. Show all posts

Milani Blue Flash & Some Nail Art

Posted by Unknown on Monday, June 18, 2012


This is two coats of the super sexy Milani Blue flash. Easy to apply  as long as you wait a few minutes between coats. It dries a bit gritty & with a matte finish so it needed a couple of coats of topcoat but it's well worth it in my opinion. Gorgeous deep teal & sparse black micro glitter!
One of my new favorite books, Among Others by Jo Walton, also happens to have a pretty cover.
 
The next day I add a bit of China Glaze Ruby Pumps. I love this manicure, super hero glitter nails!
Thanks for reading!
April

More about → Milani Blue Flash & Some Nail Art

Delicious Stripes

Posted by Unknown on Friday, June 15, 2012


You probably won't ever see me wear red and pink together when it comes to clothing, I think they clash more often than not, but somehow I think they make a pretty cute pair on nails. In this mani I'm wearing NYC Uptown with red stripes that I freehanded on top with striper polish #36 from brand Janet. Don't these nails look a bit like candy? ^^ I can almost smell a strawberry scent when I look at them... Have a great evening!

More about → Delicious Stripes

Sation Sporty Kar Red

Posted by Unknown on Wednesday, May 16, 2012


Sation bottles are oval with thick glass bottoms. The new brushes are great for ladies like me that love wide brushes. The formula on all the ones I've tried is excellent. You can purchase Sation's Big 3 Free polishes at their website.

Sation Sporty Kar Red is a lovely true red with a finish somewhere between a creme & a jelly. Shown here at just two easily applied coats. I hated red polish when I first started painting my nails a few years ago, but now I know there is no denying the appeal of classic red nails.
 
My adorable Wally!


Thanks for reading!
April

This polish was sent to me for review. All opinions are my own & were not influenced by Sation! For more information you can read my disclosure policy.
More about → Sation Sporty Kar Red

Queen's Day 2012

Posted by Unknown on Wednesday, May 2, 2012


Hello everyone, here's my belated Queen's Day post! On this national holiday everybody wears orange and sometimes with hints of the Dutch flag, so that's exactly what I did here. I started with the orange and then layered the red, white and blue on top, using tape for crisp lines. This mani took forever to make as I had to wait three times in between for my polish to dry before I could place the tape on my nails, but it was definitely worth it and I received many compliments on it that day. ^^

To show our country a little love on days like these, the Dutch brand Koh set up a little collection with 'Dutch' colors which I've used for my Queen's Day mani. Below are swatches of each polish.


Brilliant Red!. This is a classic red jelly with a hint of orange, it's very pretty and bright but not unique. It does have a great formula and application, like I'm used to from most jellies. This was two coats, and as you can see it still shows a tiny bit of VNL but strangely it doesn't bother me much in this case.


Crystal!. This was my second favorite polish from these four (and the only one I didn't include in my mani because it was too sheer). I honestly expected to hate it as it's a frosty white which looks very dated to me, but I ended up loving it! When you think of frosts, you think of brushstrokes, but fortunately Crystal! doesn't suffer from those with its easy application. :) It takes three coats to get full opacity, but it's totally worth it in my opinion. And I know it's not even summer yet, but Crystal! would be a great color for winter too, look at that pearly shimmer! I already start to feel Christmassy when I look at it haha.


Rock Chick!, my favorite from the bunch. ^^ This cobalt beauty is so bright that it looks like a neon in certain lighting, really gorgeous... And like Brilliant Red! this is a jelly with a perfect, rich formula. It covers perfectly in two smooth coats, love it!


And the last one is Dutch!. Like many other girls, I'm not a big orange fan when it comes to nail polish. But it is the perfect orange for Queen's Day or to show our team some support during the UEFA European Football Championship this summer! Pictured is three coats, once again the application was very nice.

Thanks for reading!

The products in this post were sent to me for review.

More about → Queen's Day 2012

Nude V-gaps

Posted by Unknown on Wednesday, March 14, 2012


Hello everyone! For this post I've got nude V-gaps to share with you, I made them yesterday when I was going for a "dramatic" look haha. To make the V-gaps I used tape as usual, I cut out triangles with acute angles to make my nails seem a little bit longer. ;-) The polish to go with the design was Essence Fateful Desire, a vampy red jelly/creme. It did need two coats to cover, so I couldn't remove the tape immediately after one coat of polish, which I normally do for nice, crisp lines. But I kept both layers thin so in the end it still turned out neat enough. :) And since I wasn't wearing a basecolor, I could place the tape right away, which made this mani pretty quick to do as well, I like that! :-) What are your thoughts on this mani? Would you give this a try yourself?
More about → Nude V-gaps

Sation Classical Note & Bump In Beige & Some Quick Nail Art

Posted by Unknown on Tuesday, February 28, 2012

Sation recently updated their brand & bottles & I have a few of their new polishes to show you. The bottles are oval with thick glass bottoms. The new brushes are great for ladies like me that love wide brushes. The formula on all the ones I've tried is excellent. You can find out more about the brand on their Facebook page.

First we have Classical Note, a dusty berry with a finish somewhere between a creme & a jelly. Great formula & only needs 2 coats. A classic just as the name suggests!
Next is Bump In Beige, a new favorite color that I've already worn twice. It's a beautiful shade of beige with just a hint of rose in the same creme/jelly finish as Classical Note. Often colors like this are hard to work with but Bump In Beige has a dreamy formula.
 
The next day I tried a little nail art with the fan brush that came with nail art brush set. I'm not entirely pleased with the results but it was easy & very fast.
Thanks for reading!
April
More about → Sation Classical Note & Bump In Beige & Some Quick Nail Art

Comparison: Pepe's Purple Passion vs. We'll Always Have Paris

Posted by Unknown on Tuesday, February 21, 2012


These two are incomparable for some and incredibly close for others. On the left we have OPI Pepe's Purple Passion and on the right OPI We'll Always have Paris. Pepe's Purple Passion was released with The Muppets collection last Christmas and Paris was released a few years ago from OPI's France collection. I think it may be a part of the main line though.


Very minor differences. Pepe has very small flakie pieces and is a fraction lighter but the shimmer isn't really all that obvious. Then we have Paris who is a beautiful deep raisin creme.

Late last year I was dying for this colour but now I think I don't need both. 


What would you do?
More about → Comparison: Pepe's Purple Passion vs. We'll Always Have Paris

Valentine's Day

Posted by Unknown on Tuesday, February 14, 2012

Hi everybody, happy Valentine's Day! The boyfriend and I don't really celebrate it, but tonight we're going out for dinner together with some friends which should be really fun. :) But before that I wanted to share a few Valentine manis I made with you. I'd really wanted to post them earlier, but sometimes life just gets in the way. ;-) Let's see some nails then! I decided to keep the colors classic, using mainly red and black.


The first one up is this heart accent nail. I used China Glaze Phat Santa for my regular nails and went for OPI DS Reflection on my ringfinger for a bit of sparkle. Then I drew on the heart shape with a black creme and filled in the background. (I could've just drawn the hearts on top of the black since Reflection is actually quite opaque, but I discovered that after I'd already finished the first, big heart lol.)


Stripes go well with any occasion in my opinion, so Valentine's Day is no exception! :) I freehanded the random stripes with China Glaze Ink, as usual. Simple but I love it! ^^


I already did a lot of cloud manis lately, but I just had to include one in this post because it's so fitting for today and easy to do. :) Here I went for a single cloud layer which is even quicker to make. You can check out the tutorial for this design here.


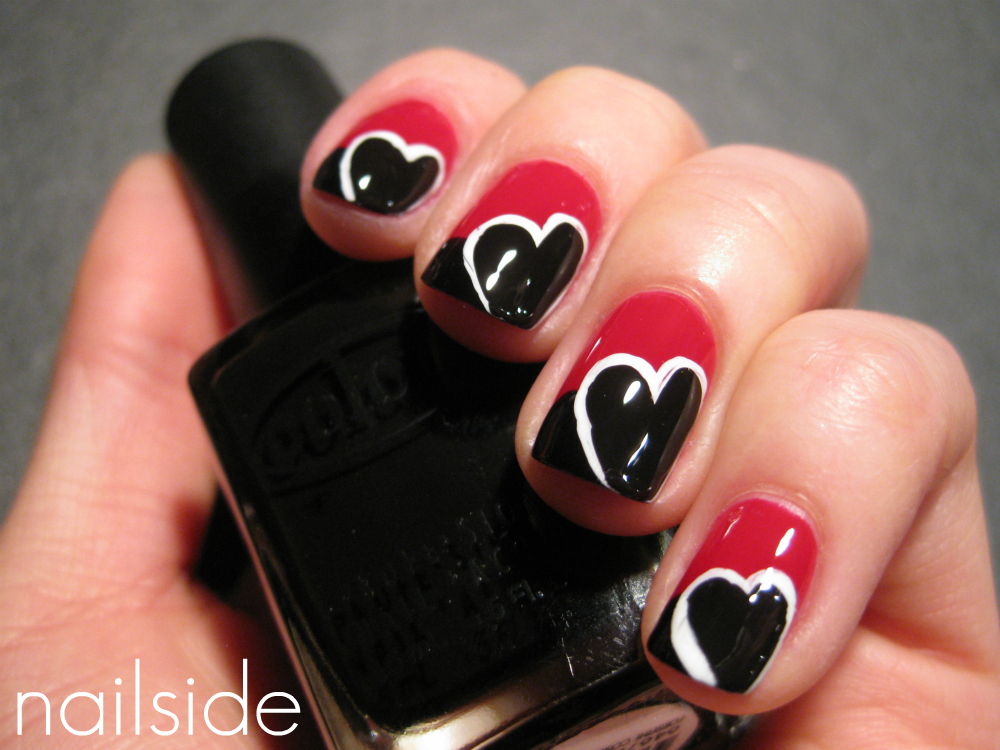
I get a lot of my ideas by accident, that's why experimenting with nail art is so much fun. ^^ I noticed a heart shape in the cloud tips from the previous mani, so I outlined the shape with white (Essence Stampe Me! White) and drew a heart in it with black again. I find it pretty hard to draw thin lines sometimes, so by starting with the white and going over it with black, leaving a gap of white, it's easier to achieve the thin line I want. Like with the previous manis I used Phat Santa for the red.

In this post I'd also like to include a few older manis to inspire you (also to add some pink in here haha). You can view the complete post of each mani by clicking on the picture or the description.

Laced up
Vampy French
Guestpost for Ivana Thinks Pink
Cartoon hearts. (You can find the tutorial here).
China Glaze Designer Satin and Essence Blair
Nude with hearts
Cute funky French
Thanks for reading and have a great night!
More about → Valentine's Day

Freehand '80s

Posted by Unknown on Sunday, February 5, 2012


Hi everybody! This is the nail art I made with H&M's Navy Cosmos as my base color. I was just playing around with my favorite nail art striper China Glaze Ink, looking for an easy freehand design. You all know I can't live without my precious tape when it comes to nail art, but let's face it, using tape can be quite time-consuming! So (easy) freehand designs are a nice alternative every now and then. :-) For this pattern that looks kind of '80s to me, I started drawing the zigzags on each nail. After I'd finished there was still something missing, so I used a dotting tool to fill in the empty spaces with big dots. I thought it turned out pretty cute in the end, but the best part was that the whole job was such a piece of cake. ^^ I used Essence Matt top coat for that ultimate matte finish, but below you can also see the glossy version that I just had to share with you. :) Hope you guys like it!
More about → Freehand '80s

H&M - Navy Cosmos: part 1

Posted by Unknown on Thursday, February 2, 2012


Hi everyone! For this post I have the red part of H&M's Navy Cosmos to show you. Like with H&M Plum it wasn't so much the color that I fell for, but the super sweet bottle! I couldn't resist the red and blue with the polka dots in the middle, even when I actually hate these narrow bottles with a polish on both ends. They're difficult to store, difficult to polish with because of the extra weight at the top, but boy they sure look cute!
The red creme of this polish duo is very vibrant, almost neon-like I'd say. The formula was a little bit goopy, but still manageable, needing two coats to cover. I know it's not the most unique color out there, but I like it nonetheless. It's a lot brighter than I expected it to be and I can't wait to wear it for summer! ^^ 
More about → H&M - Navy Cosmos: part 1

Fancy clouds

Posted by Unknown on Tuesday, January 10, 2012


Hello dear readers :) This post I'd like to share this cloud mani with you. The red I've used is China Glaze Phat Santa, I bought it last Christmas in a set with Jolly Holly and Party Hearty, which I now happily own! (For some really strange reason I thought I didn't need Party Hearty when it came out in 2010, so weird, because it's so pretty!) I'd worn Phat Santa on its own for a day, but the next day I already had subtle tipwear on some nails, so that's when I applied the layered cloud look to cover up things. Another reason why I love this design ;-) The silver and black are China Glaze Millenium and Color Club Where's The Soiree? respectively, two of my most often used polishes.
I've received many requests for a tutorial for this cloud design, so you can expect it soon :) In the meantime you can read how I make the pattern in this post. Thank you for reading!

More about → Fancy clouds