Home » Posts filed under Claire's
Posted by
Unknown on Saturday, March 17, 2012
Hey guys!!!! Whew, I've been so busy today getting ready for our neighborhood St. Patrick's Day party. I did manage to make time to get pics of my mani and post, whoo hoo! This will be short though sorry, because I have to wake Jack up and go run more errands.
Hope you guys have a great day and night!!!
I started with Nubar Reclaim for the base of my St. Patty Day mani

I then used Claire's 14 Karats gold polish and my Bundle Monster plate BM19 for the polka dots.
Posted by
Unknown on Friday, July 15, 2011
July 15, 2011
I have seen Claire's Bedazzled all over blogs. I fell in love with it... so of course, I bought it!!! I mean who wouldn't....I can't believe how awesome this polish is. All the other blogs were right--the pictures do not do this polish justice.
I paired mine with Sally Hansen The Real Teal (which happened to stain my nails). Before removing the manicure, I had to see what a konad stamp would look over it, so I have pictures of that too. In addition, I loved this Claire's polish so much I had to see what it looked like as a french tip. The base coat for that manicure is Konad Regular Polish in Light Silver. In those pictures you will notice that my ring finger is entirely covered with Claire's bedazzled--that's because I wanted to see what the polish looked like thick. Overall, this polish is AWESOME!
Outside
Inside no flash
Outside
Outside in the shade
Outside
Inside No Flash
Outside in the shade
Outside
Inside No Flash
I am not fond of the pictures to follow....These were taken inside with the flash on.
Posted by
Unknown on Thursday, July 7, 2011
July 07, 2011
You can click on any picture to enlarge.
This manicure was simple but fun. I used three coats of Claire's Lilac Shimmer Rose Polish as a base coat (click the link to view online). The polish color was hard to capture on camera because the sun kept washing out my hand and almost made it appear as if I wasn't wearing a polish at all. I was able to capture the color in some pictures. The polish has a pearly, shimmery appearance to it.
Then I just applied the SuperNail Dragonflies Appliques I got from Sally's Beauty Supply (click here to view online). When I placed the dragonfly accessory on my nail I made it have a 3D effect on purpose. I wanted it to look like the dragonfly was actually "flying". I could have made the accessory flush with my nail as if it was a sticker or a stamp. Because I change my polish often, I wanted the wings to be raised. So what do you think of it?
Here are some more photos...

Posted by
Unknown on Monday, July 4, 2011
Click on the pictures to enlarge them so you can hopefully see the detail of the polish..
So the other day, I went to Claire's and found this really neat polish. Has anyone ever seen this type of polish before? I wish I had a better picture that really shows all the colors. It was night time when I tried out the polish the other day, so didn't have natural sunlight. This polish has so many colors mixed into one. The orange and yellow colors over power the green and pink polish toward the bottom of the bottle. I assume once I get to the bottom/middle of the bottle, I will see more of the green and pink. Can you see the mixture of colors in these pictures? I just thought this polish was neat. It has a natural semi matte finish. It is not shiny.
Posted by
Unknown on Monday, May 2, 2011
Since I had a little time yesterday, I did some stamping. I used one of my new Bundle Monster plates, but the actual image I used, can be found on both Konad and the older Bundle Monster plates. I started with 2 coats of Essie Splash of Grenadine. Which I couldn't get really good color accurate pics, so I'm sorry. It is more pink IRL. My camera wasn't working well, and the sun wouldn't stay out long enough :(
See this first pic was inside, and is possibly the closest to accurate
These were outside, when I was literally chasing the sun in my backyard, lol.
I then used the plate, BM-209 and Claire's 14 Karats for the design.
Update on Junior, he is doing great, become VERY active and jumping all around, and eating well :)
Posted by
Unknown on Saturday, March 26, 2011
A couple of weeks ago I bought Color Club's Wicked sweet collection and this is the first nail polishes that I have bought that were scented. Ive always wanted to try them but didn't really like the colors I was finding. This collection had some great vibrant colors so it was a must have. I just realized Color Club raised their prices I bought this collection for $17.50 and I looked at Transdesign and VNS and they are now $21 so now each polish is $3 which is about the same price as China Glaze if not more I don't think its right.
The first color I tried from the collection was of course the pink named Yum Gum. It applied great I did 3 coat with a top coat and after it was dry it smelled just like bubble gum. I was walking around smelling my nails and making other smell my nails. I wore this for a week and by day 3 the smell was starting to wear off.
I got bored after it no longer smelled like gum so I wanted to add a little something to it since I was also going to Foxwoods with my hubby that night. I wanted to bling it out with theses full nail bling stickers I got from Claire's this was the 1st time I used something like this. I applied them over the nail polish. This is what it looked like that night sorry about the dark picture.
This is what it looked like in the car and by the time I got to Foxwoods the stickers were starting to lift up and slide off by the end of the night I probably only had like 1 left. I really liked what it looked like and I still had a couple left in the pack so I decided to do accent nails with them and this time I before I applied them I added some nail glue to make sure they wasn't lifting off hours later. The bling on the accent nail didn't come off till I got bored with them which was 2 days later but I'm pretty sure it would have lasted a lot longer.
I will probably buy theses again but of course not follow the directions and just apply them with some nail glue instead. Have any of you seen or tried theses before?
Posted by
Unknown on Saturday, March 5, 2011
Before I removed the Sally Hansen Lightning, my previous posted mani, I decided to try a Konad over it. I used Claire's 14 Karats and Konad plate M71.

I just wanted to share my view from the couch as I was taking these pictures. My hubby and our Chi Rolo, they are BFF's, lol.
Posted by
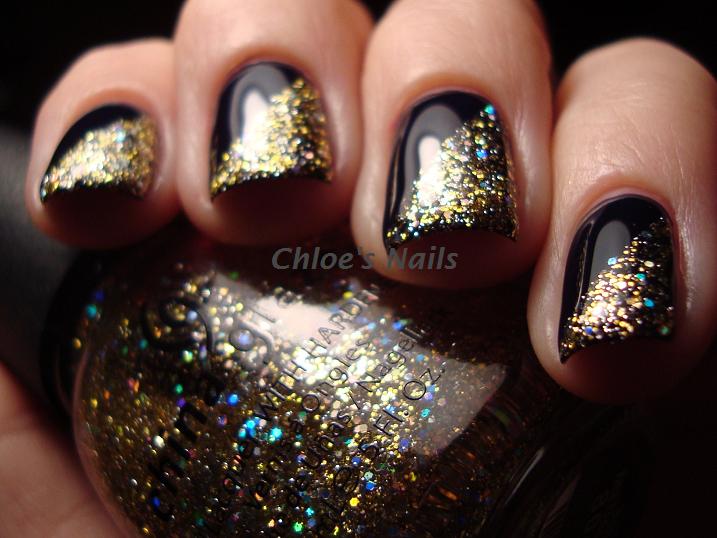
Unknown on Tuesday, February 15, 2011
Good morning everyone! If you missed my post last night, please make sure to read it.
Okay as you can see I decided to keep my watermark semi small, and hopefully not to annoying :) Some pics have 2, only because they were already ready to be posted, but only the middle one will be there after this post.
Anyways, I wanted to use some gold glitter, and had to reach for my China Glaze Medallion. It is by far my fave gold glitter in the world, and very hard to capture it's beauty on camera. Since I have also been on a semi matte kick, I decided to use my Claire's Matte Cobalt polish. I also just love navy and gold together :)
I started with 2 coats of Cobalt Blue
Then using tape, taped off half of my nail, and added Medallion
I then added a top coat to remove the roughness and so I don't remove layers of skin, since I tend to be accident prone.