Home » Posts filed under Freehand
Posted by
Unknown on Friday, June 15, 2012
You probably won't ever see me wear red and pink together when it comes to clothing, I think they clash more often than not, but somehow I think they make a pretty cute pair on nails. In this mani I'm wearing NYC Uptown with red stripes that I freehanded on top with striper polish #36 from brand Janet. Don't these nails look a bit like candy? ^^ I can almost smell a strawberry scent when I look at them... Have a great evening!
Posted by
Unknown on Sunday, June 3, 2012
Hello everyone! The final weeks of school have started and it's been nothing but chaotic! This explains why I've been posting so little lately. The madness still continues for a couple of weeks but after that I hope to blog more often again, I've got plenty of fun stuff planned.
So yes, I should be studying right now, but I just needed a break to show you these nails. :-) Holland has had great summer weather last week and I wore a bright yellow (Make-Up Studio M67) most of it. After two days I had a bit of tipwear, but I just couldn't take the happy yellow off yet. And the tipwear wasn't noticeable anyway because it's a light color, so I decided to keep it on and update it with a tribal pattern in shimmery blue. The striper polish I used for it is Janet #119. I kind of like the final result, very exotic. ^^ Chiquita, anyone?
Posted by
Unknown on Sunday, May 13, 2012
Hello everyone! And happy Mother's Day to all the mommies out there. :-) Yesterday I already showed you my
tribal accent nail. And as much as I liked it, I couldn't stop wondering how a full mani with the black and white pattern would look, et voilà! ^^ I had a lot of fun working on it and I can't wait to do it again in different colors, any color schemes you suggest?
Posted by
Unknown on Saturday, May 12, 2012
Oooh, more tribal nails! I hope you don't mind. :-) I just love how detailed it looks with only little effort, especially if you use it for an accent nail only. Also it's a cute eyecatcher that way and a great excuse for being lazy, haha. The tribal print was freehanded with a white striper polish over black and the purple is OPI's Planks A Lot. Thanks for stopping by!
Posted by
Unknown on Thursday, May 10, 2012
Hi everyone! I hadn't done a freehand design in a while so today I made a detailed tribal pattern on a few accent nails. The basecolor is the lovely Westside Warrior from China Glaze and I used a gold striper polish (Janet #115) for the nail art. Though it looks pretty detailed it was really simple to make. I drew a few stripes on each nail and then I filled in the bigger stripes with dots or zigzags, that's it! I hope you like it. :)
Posted by
Unknown on Thursday, April 26, 2012
Today is the 4th day of Spring Challenge hosted by dear blogger friend
Purple Glitters... The theme was bugs... And I chose yellow&green color combination for this theme...
I had no yellow nail polish, so I went and bought this lovely yellow from Pastel. It is Limited Collection #308, with tiny gold glitter in it... Perfect color for spring....
I made the flowers and the lady bug freehand with my Flormar Nail Art polishes and my lovely dotting tool.
For the last day of the challenge, we will be doing a rainbow... Let's see how that one will turn out... :)
And finally, the ladies who participate with me are;
Posted by
Unknown on Sunday, April 8, 2012
Happy Easter everyone! When I think of Easter nail art, I think of pastel shades and detailed designs. But after wearing soft colors so often lately, I wanted to have something brighter on my nails now! :) I started with H&M Wildflower as my basecolor, then I painted half of the nail turquoise with Essence Bella, using tape for crisp lines. Finally I added a few dots with Color Club Almost Famous and my funky Easter mani was done. :) Have a great day!
Posted by
Unknown on Thursday, March 1, 2012
Scroll down for English...Heyyy! İlk çizim denememi yaptım... Tamam, çok zor bir desen değil ama başlangıç için fena sayılmaz... :) Ama çizgileri biraz daha ince yapsam daha iyi olacak gibi...
Golden Rose'un mat renklerinden 11 numara var elimde. Aslında bunu siyah gibi düşünüp almıştım. En azından şişede öyle görünüyordu. Ama sürünce çok koyu bir gri olduğunu farkettim. Neyse, bu renk de güzel. Çizgileri Rimmel Your Majesty ve ince fırça ile yaptım... Oje mat ama, ben üzerine parlak top coat sürmeden edemedim. O yüzden matlık özelliği kayboldu... :)
Yay! I made my first freehand drawing today... Well, it's not much, but it's a start. I should learn to make thinner lines though... :) On my nails, I have Golden Rose Matte Collection #11, which I thought was black, but turned out to be a darkkkk grey... I painted the "fat" lines with a nailbrush and Rimmel Your Majesty, which is my favorite cheap silver for stamping... :) By the way, I couldn't resist putting on a shiny top coat, so the matte color is gone!!! :)
More about → Bugün Ne Sürdüm? - Golden Rose Matte 11
Posted by
Unknown on Monday, February 27, 2012
Hi guys! This China Glaze post is my first one featuring a polish from the Electro Pop collection. Since swatches of the collection can already be widely found on the web, I decided to post each polish seperately with the nail art I made with it. This way I can show you a little extra something besides the polish itself. :) Let's see some purple awesomeness then!
Gothic Lolita, my favorite of the collection, is a slightly dusty, medium purple. The formula of this creme was a tad thick but still I had no problems with the application. I was amazed by the opacity of this polish, it was almost a one-coater but I did two for complete coverage. (It is strange however, how my bottle of Gothic Lolita covers so well while I read others needed three coats.) What makes this polish so special, without a doubt is the subtle blue and pink shimmer. It's not that visible from a 'normal' distance, but it definitely gives everything more depth.
For the nail art I went for my good old black stripes, made with my trusty striper Ink from China Glaze, can't get enough of stripes! ;-) What do you think of it?
This product was sent to me for review.
Posted by
Unknown on Thursday, February 23, 2012
Hello everyone! Welcome to my Miffy tutorial. :) This design was dedicated to a friend, but aside from that I've always loved this Dick Bruna character as I grew up with it. So having it on my nails at age 22 doesn't only look cute but also brings up childhood memories haha. ^^ Miffy isn't too difficult to recreate, all you need is a few basic colors and a little patience. ;-) You can use regular nail polish to draw her, but I prefer acrylic paint in this case, because it's more opaque and doesn't dry too quick so it's easier to work with. Let's give it a go, shall we? :)
First apply your basecolor (with a basecoat underneath) and let it dry.
Then use your nail art brush and black acrylic paint to draw the contours of Miffy. Start with an oval for the head, then add two bunny ears and a part of the body.
Then use white to fill in the shape, leave a small gap of black for the outlines of the drawing.
Give Miffy a top by filling in the part below her head with orange. Because you've applied white beneath it first, the orange will really pop.
Finally complete Miffy's face with two tiny eyes, her cross-shaped mouth and a black line between her head and body.
The surface is still quite bumpy, so finish with a coat or two of topcoat once everything's dry. Your design is now smooth and protected. :)
Tip: To clean your nail art brush(es), pour a little bit of nail polish remover in a small dish or the lid of the bottle. Let your brush soak in it for a few seconds and dab it a few times on a cotton pad. Repeat this until your brush is clean.
I would absolutely love to see your attempt on my design, so feel free to leave a link to your creation in the comment section!
The polish I used in this post is OPI Suzi Says Feng Shui.
Posted by
Unknown on Sunday, February 19, 2012
Hi everybody, for this post I have Miffy nails to show you. :) This mani was made for a dear friend of mine who collects Miffies. (I hope you liked it, sweetie!) The base color is OPI Suzi Says Feng Shui and for the little Miffy on my ringfinger I used acrylic paint. You might've noticed the pixeled picture in the left corner of a new tutorial, which is indeed for this design. :) So you can expect it very soon!
Posted by
Unknown on Tuesday, February 14, 2012
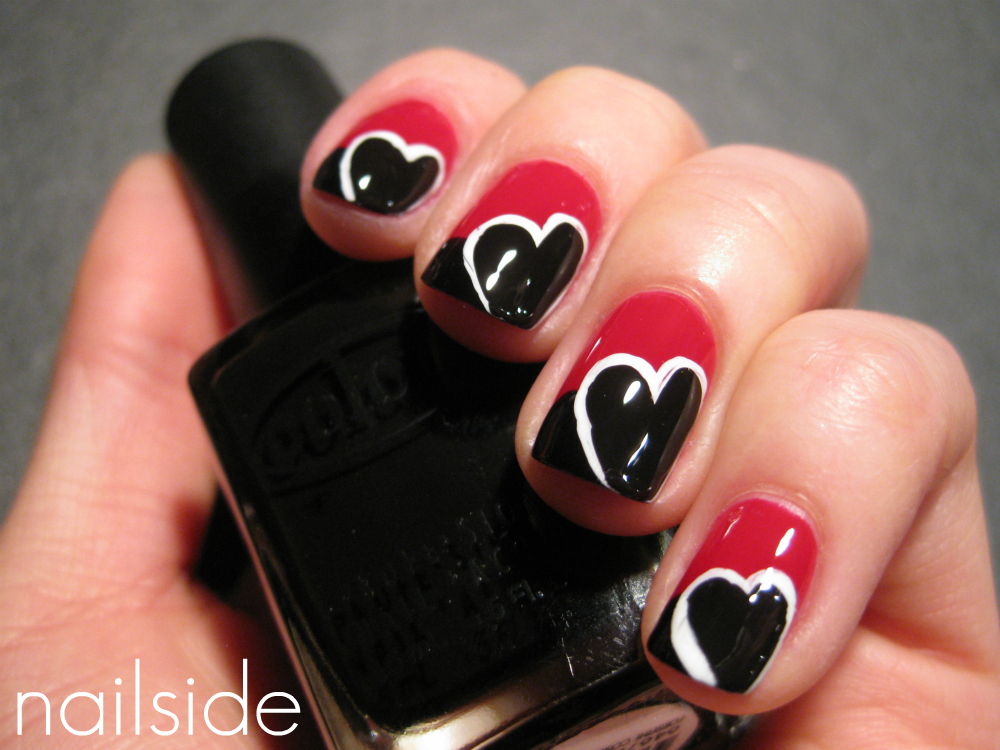
Hi everybody, happy Valentine's Day! The boyfriend and I don't really celebrate it, but tonight we're going out for dinner together with some friends which should be really fun. :) But before that I wanted to share a few Valentine manis I made with you. I'd really wanted to post them earlier, but sometimes life just gets in the way. ;-) Let's see some nails then!
I decided to keep the colors classic, using mainly red and black.
The first one up is this heart accent nail. I used China Glaze Phat Santa for my regular nails and went for OPI DS Reflection on my ringfinger for a bit of sparkle. Then I drew on the heart shape with a black creme and filled in the background. (I could've just drawn the hearts on top of the black since Reflection is actually quite opaque, but I discovered that after I'd already finished the first, big heart lol.)
Stripes go well with any occasion in my opinion, so Valentine's Day is no exception! :) I freehanded the random stripes with China Glaze Ink, as usual. Simple but I love it! ^^
I already did a lot of cloud manis lately, but I just had to include one in this post because it's so fitting for today and easy to do. :) Here I went for a single cloud layer which is even quicker to make. You can check out the tutorial for this design
here.
I get a lot of my ideas by accident, that's why experimenting with nail art is so much fun. ^^ I noticed a heart shape in the cloud tips from the previous mani, so I outlined the shape with white (Essence Stampe Me! White) and drew a heart in it with black again. I find it pretty hard to draw thin lines sometimes, so by starting with the white and going over it with black, leaving a gap of white, it's easier to achieve the thin line I want. Like with the previous manis I used Phat Santa for the red.
In this post I'd also like to include a few older manis to inspire you (also to add some pink in here haha). You can view the complete post of each mani by clicking on the picture or the description.
Thanks for reading and have a great night!
Posted by
Unknown on Sunday, February 5, 2012
Hi everybody! This is the nail art I made with
H&M's Navy Cosmos as my base color. I was just playing around with my favorite nail art striper China Glaze Ink, looking for an easy freehand design. You all know I can't live without my precious tape when it comes to nail art, but let's face it, using tape can be quite time-consuming! So (easy) freehand designs are a nice alternative every now and then. :-) For this pattern that looks kind of '80s to me, I started drawing the zigzags on each nail. After I'd finished there was still something missing, so I used a dotting tool to fill in the empty spaces with big dots. I thought it turned out pretty cute in the end, but the best part was that the whole job was such a piece of cake. ^^ I used Essence Matt top coat for that ultimate matte finish, but below you can also see the glossy version that I just had to share with you. :) Hope you guys like it!
Posted by
Unknown on Thursday, January 26, 2012
Hi everyone :) This is how I wore the cloud design after finishing the
tutorial. I used Barry M Shocking Pink, China Glaze For Audrey and Essence Let's Get Lost and combined it with Essence Bella on the rest of my nails. I love how it turned out! It's so cheerful and kind of like the opposite of the more serious
grey cloud I did last week.
Also a big thank you for all the lovely comments that you guys left on the tutorial, you're the best! It makes me so happy to know it helped or inspired you. And I've really enjoyed all the awesome cloud manis that you shared with me so far, so keep them coming! See you next time. :)
Posted by
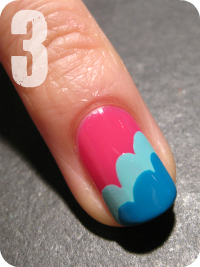
Unknown on Tuesday, January 24, 2012
Hello everybody, welcome to this tutorial! This time I'll show you how to make the freehand
cloud look. All you need for this quick and easy design is three pretty polishes and the brushes that come with it, so there's no extra equipment needed. Use this layered look on accent nails, for a full mani or... to cover up tipwear from an old mani. :) Let's get started, shall we?
First apply your basecolor and let it dry. If necessary use a basecoat underneath.
To make the cloud shape, we're simply going to apply the second polish in three strokes. Start each stroke by placing the tip of the brush on the surface and wait a little till enough polish has dripped off forming a round starting point. Start on one side of the nail and make each stroke shorter than the one before.
Tip: If your polish comes with a (big) flat brush, jus
t twist it 90° and use the side. Now it's easier to make those round edges! ;-)Then take your third color and make a second cloud layer below the first one. Let the polish dry.
Finally seal your work with your favorite topcoat and you're done! Pretty simple, isn't it? :)
I would absolutely love to see your attempt on my design, so feel free to leave a link to your creation in the comment section!