Home » Posts filed under Clouds design
Posted by
Unknown on Thursday, January 26, 2012
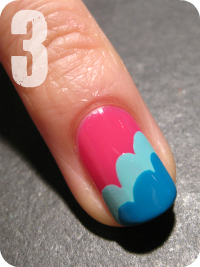
Hi everyone :) This is how I wore the cloud design after finishing the
tutorial. I used Barry M Shocking Pink, China Glaze For Audrey and Essence Let's Get Lost and combined it with Essence Bella on the rest of my nails. I love how it turned out! It's so cheerful and kind of like the opposite of the more serious
grey cloud I did last week.
Also a big thank you for all the lovely comments that you guys left on the tutorial, you're the best! It makes me so happy to know it helped or inspired you. And I've really enjoyed all the awesome cloud manis that you shared with me so far, so keep them coming! See you next time. :)
Posted by
Unknown on Tuesday, January 24, 2012
Hello everybody, welcome to this tutorial! This time I'll show you how to make the freehand
cloud look. All you need for this quick and easy design is three pretty polishes and the brushes that come with it, so there's no extra equipment needed. Use this layered look on accent nails, for a full mani or... to cover up tipwear from an old mani. :) Let's get started, shall we?
First apply your basecolor and let it dry. If necessary use a basecoat underneath.
To make the cloud shape, we're simply going to apply the second polish in three strokes. Start each stroke by placing the tip of the brush on the surface and wait a little till enough polish has dripped off forming a round starting point. Start on one side of the nail and make each stroke shorter than the one before.
Tip: If your polish comes with a (big) flat brush, jus
t twist it 90° and use the side. Now it's easier to make those round edges! ;-)Then take your third color and make a second cloud layer below the first one. Let the polish dry.
Finally seal your work with your favorite topcoat and you're done! Pretty simple, isn't it? :)
I would absolutely love to see your attempt on my design, so feel free to leave a link to your creation in the comment section!
Posted by
Unknown on Saturday, January 21, 2012
Hi everyone! For this post a grey cloud mani to match with today's weather.
On my accent nail I used China Glaze Recyle, a black creme and between those China Glaze Concrete Catwalk, which is what I'm wearing on the rest of my nails too. It's the best grey creme I've got. Just two smooth coats for an even, glossy finish.
♥I don't wear greys on their own very often, usually I just need some color to go with it. You know, to brighten things up. However, I think today's mani is cute in all its greyness :)
Do you wear greys a lot?
Posted by
Unknown on Tuesday, January 10, 2012
Hello dear readers :) This post I'd like to share this cloud mani with you. The red I've used is China Glaze Phat Santa, I bought it last Christmas in a set with Jolly Holly and Party Hearty, which I now happily own! (For some really strange reason I thought I didn't need Party Hearty when it came out in 2010, so weird, because it's so pretty!) I'd worn Phat Santa on its own for a day, but the next day I already had subtle tipwear on some nails, so that's when I applied the layered cloud look to cover up things. Another reason why I love this design ;-) The silver and black are China Glaze Millenium and Color Club Where's The Soiree? respectively, two of my most often used polishes.
I've received many requests for a tutorial for this cloud design, so you can expect it soon :) In the meantime you can read how I make the pattern in
this post. Thank you for reading!
Posted by
Unknown on Saturday, December 31, 2011
Hello everyone! Here's a quick little post on my New Year's Eve mani. Initially I wanted to do the festive
star pattern again that I wore for Christmas, but in the end I decided to go for something quick and simple instead. I don't like my nails naked, but this semi nude cloud look I like ^^ I used H&M Golden Treasure and Color Club Where's The Soiree? for the clouds and finished with a topcoat.
Have a great New Year's Eve and I'll see you in 2012! :)
Posted by
Unknown on Friday, December 9, 2011


Hi everyone :) For this post I have another Christmas mani. Since I haven't made any Halloween looks this fall, I'm planning on catching up some holiday manis with this year's Christmas ;-) Anyway, this week's been terribly busy, so I've been wearing Essie Your Hut Or Mine for the last three days. But today's weekend, yay! So I finally had time to update my mani. I added a Christmas tree for my accent nail, using tape. You know, if you think about it, a Christmas tree isn't that different from a
lightning bolt! I mainly used tape triangles which I placed underneath each other on each side of the tree to create the zigzag lines. For a little sparkle I added silver glitter on top and a larger piece of glitter as my tree topper. On the rest of my nails I made "
funky clouds", representing a snow scenery and later I added the "snow" with a dotting tool. In retrospect, I think the dots are a bit too much, so I doubt if I'm going to keep this mani longer than a day. But oh well, that means I can do my nails again tomorrow ^^ Thanks for reading!
Essie - Your Hut Or Mine
Essie - Lion Around
Orly - Pure Porcelain
H&M - Confetti Kisses
Posted by
Unknown on Tuesday, November 8, 2011

Hi guys! For this post I have another request to show you. A little while ago I received an email from a reader who wanted me to come up with a funky mani for her informal dance soon. A few colors she liked were teal and coral, so I combined them in this "funky clouds" look. I like how simple this design is to achieve. Just pick three matching colors, one for you base color and two for the cloud shapes on top. The clouds are made by applying three strokes of polish next to each other, each smaller than the one before. My tip is to leave enough polish on the brush (but not too much!) so that when it touches the surface it will leave a nice, round dot as start point. This doesn't even need a lot of precision and you can just use the brush from your polish for this. And that's it :) Though I would advise using a fast drying top coat afterwards if you don't want to wait too long for your nails to dry, after all it's three coats of polish. (Four if you include base coat.) I like the way it looks here with plain cremes, but for a more festive look, a layer of (iridiscent) glitter can be added.
Below you can see the same look with China Glaze Midnight Kiss on the tips, which I made first. But after I took the pictures I noticed how Bella matched the rest of the polishes better so I just redid everything, for your viewing pleasure haha. Have a great night!
The polishes I used:
Essence - What Do U think? Version 1 (it looks less orange in real life)
China Glaze - For Audrey
Essence - Bella
Posted by
Unknown on Saturday, November 5, 2011
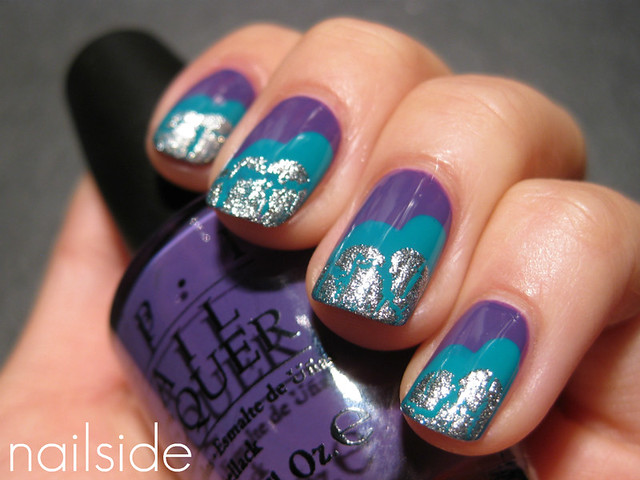
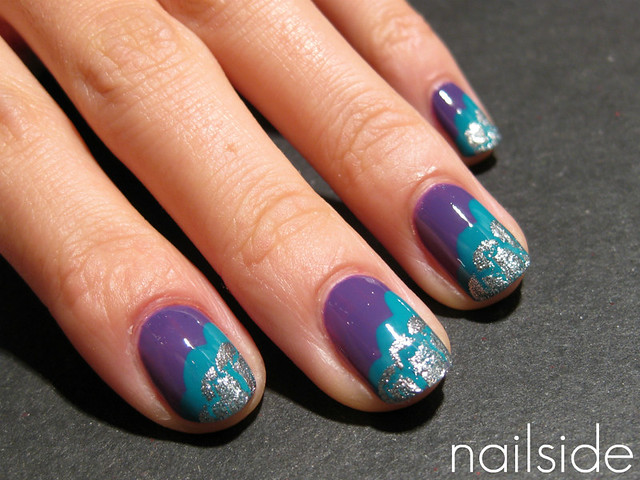
Hello everyone! I was in the mood for some funky nail art tonight but I didn't feel like spending too much time on it. And that's how I came up with these "funky clouds" you're looking at. I'm still no good at making up names for designs so don't make fun of me haha :P I started with two coats of
OPI Funky Dunkey and then I applied Essence Bella on top in three quick strokes that form the cloudy shape together. After it had dried I repeated the steps a bit closer to the tips with OPI Silver Shatter, a layer of top coat and there you have it! I think it turned out pretty cute ^^ And I can't wait to use it with other color schemes. Hope you guys like it too! Good night :)